Thursday, September 29, 2022

Pigeon Toast Wedding Card

Hello everyone, it's Karen here today.  I was totally inspired by Jennifer McGuire’s recent video on making simple pendulum cards. It was sheer genius and the minute I saw it, I thought about using her technique with Gerda Steiner's pigeons. If you haven’t seen Jennifer’s video, here’s a link to it - Cards with Simple Movement.


Now, I know this is not your typical wedding card, but it is a fun one!

To make this card, I used a 5 x 5" card base and also cut a card front from white cardstock that was the same size, as well as one from the background paper which is from the Belle Fleur collection by Craft Consortium.  I wanted the background to look a little like wedding card material! I adhered the white card front and the wedding paper together.  I also die cut a circle from white cardstock and one that was slightly larger from silver holographic cardstock.  The Bubble Circle is from Memory Box, and I cut three of these from white cardstock and one from the holographic cardstock.  These were glued together with the holographic one on top. I glued the silver and white circles to the card front in the upper third of the card, and then glued the Bubble Circle around it.

I stamped the pigeon which is from the A Toast to You stamp set by Gerda Steiner Designs, onto Neenah Solar Crest 80# cardstock twice.  On the second image, I only stamped the lower half of the pigeon, below the piece of toast, and just masked off the toast with a piece of Post It paper.  I used Copic markers to colour in the pigeon (N4, N2, N1, N0, E34, E53 and E30), and then fussy cut them out.  For the head image, I only coloured to the end of the toast and only cut this part out.  On the bottom portion of the pigeon, I slightly extended the lines of the body before colouring, and then cut this slight extension out with the rest of the lower half.

To create the pendulum mechanism, I cut a small strip of packaging acetate (about 2" x 1/2" wide), and rounded the top edge with my scissors.  I attached a penny to the bottom of the acetate with double sided tape. I positioned the pigeon pieces where I wanted them to go on the circle, and marked with a pencil just behind the center of the head.  Using a large paper punch, I punched a hole here, cutting through all the layers of the card front.  I also cut a circle of doubled up foam tape, using a regular paper punch which was slightly smaller than the hole I had made on the card front. I attached this piece of foam tape to the top of the acetate pendulum, and from the back of the card, pushed the foam tape through the hole I had made, to the front of the card.  I attached the pigeons' head over top of this foam circle, securing the pendulum to the card.  I then glued the lower half of the pigeon in position under the toast. The pendulum can swing quite wildly if you don't minimize its movement, so I figured out how far I wanted it to swing and put strips of doubled up foam tape on the back of the card to stop it swinging too far. Finally, I placed doubled up strips of foam tape all around the edges of the card, being careful to not interfere with the movement of the pendulum.  To attach the card front to the base, I used low tack tape on the front of the card to keep the pigeon in position, and then removed the backing paper from the foam tape and adhered it to the card base.

I created the sentiment on my computer and printed it out.  I've got a new laser printer, so although it doesn't show in the photo, I did foil the sentiment in my laminator with silver foil.  I matted that onto a strip of the holographic cardstock and attached that below the pigeon.  Finally, I added a few silver pearls because, well, it is a wedding card after all! 

Thank you for stopping by and I hope you'll give this technique a try as it is a lot of fun!


Tuesday, September 20, 2022

You're one in a Melon

Hi there,

it's Tanja here and I created this sweet summer card using the bear from the Gerda Steiner Designs Melon Friends stamp set - Gerda's bears are just the cutest ...

  • stamp the bear and some melon slices from the Gerda Steiner Designs Melon Friends set with Lawn Fawn Jet Black - use the Masking Technique
  • color the images with Spectrum Noir Triblend Markers, add extra shading with Faber-Castell Polychromos pencils and highlights with a white gel pen
  • use a black gel pen to accent the melon seeds
  • stamp the sentiment from the same set with Versafine Onyx Black
  • add strips of pink cardstock and of patterned paper to the left and right side of the panel before adhering it to a cardbase


Thanks for stopping by.

Hugs,


Friday, September 16, 2022

Trick or treat by Noga Shefer


Hi crafty friends,  Noga  here and I am so happy to share with you another project for Gerda Steiner Designs today.


My tag featuring the adorable Where is the Candy? 4x6 Clear Stamp Set .
How cute is this dog?

To make this tag I die cut a tag out of Bristol smooth cardstock. 
I ink blended the background using spun sugar distress oxide ink with spider web stencil.

Next I colored the sweet image using copic markers and  glued it to my panel with foam tape for dimension.

Than I stamped a greeting from this set using black ink.

For a final touch, I added a tiny spider from Ghosts 4x6 Clear Stamp Set.
I hope you enjoy the tag I created and feel inspired to create!

Thanks for stopping by,

Tuesday, September 6, 2022

Scary Birthday Card

Hello crafty friends, it's Karen here today and I've got a fun birthday card today for someone with an October or fall birthday. It's an interactive card as the ghosts are all on swing mechanisms and move when the card is shaken.


I've used the "Ghosts" stamp set from Gerda Steiner Designs for this one.  My card is 5 1/2 " x 5 1/2" square, so slightly bigger than normal.  I started by creating the background.  I used Cosmic Shimmer Pixie Sparkles Powder in Wild Plum, Pumpkin Patch and Cut Grass.  These are those fun shimmer powders that you sprinkle on, mist with water and wait to see what happens.  It's a lot like alcohol inks - no two pieces turn out the same.  Once I had the colour that I wanted, I set it aside to dry.

I used some Copic markers in BV23, CO and C1 to colour in the ghosts, and then fussy cut them out.  The cemetary is from a "Graveyard" die set from Creative Expressions and I cut it from black cardstock.  I also cut a few clouds from white cardstock as they were needed to hide the swing mechanisms.  Once the background was dry, I glued the cemetary in place, and white heat embossed the sentiment which is from the Ghost stamp set. 

The swing mechanisms are easy to make and no special dies are required.  I used a piece of packaging acetate from a die set.  Using a regular paper punch, I punched a hole near the top left corner of the acetate.  I then cut a strip of the acetate just slightly wider than the hole, and just rounded the outside top edges around the hole.  The picture may help explain this better.


I then doubled up some foam tape, and used the same hole punch to punch out a piece of the tape. This foam tape fits inside the circle on the acetate, so if it feels too tight, you can use the paper punch to slightly enlarge the hole.  The acetate needs to be able to swing freely.  Next, I decided where I wanted my ghosts to go on the card front, and placed the acetate strips there.  I removed the backing paper from the circle pieces of foam tape, and placed them inside the acetate circles.  Then I used double sided tape to adhere the ghosts where I wanted them to go on the acetate strips, and trimmed the long side of the strips so they didn't stick out from behind the ghost.  If you want your ghosts to have a lot of movement, you can attach a penny to the back of the ghost which gives it more weight (I used regular cellophane tape to attach mine).  To prevent the strips from falling off the card, I attached the clouds over the foam circles and added a little more doubled up foam tape above the swing mechanisms to help support the clouds.  You want to be careful where you put the foam tape as you don't want to impede the acetate from swinging.  That being said, if the ghosts swing too much, you may want to put a little piece of doubled foam tape under the cloud to block some of the movement. Just play around with it until you have them moving the way you want them to.  It's not hard, I promise you, but it is a lot of fun.  
 
Before attaching the card front, I stamped the inside sentiment and added the extra two ghosts.  Finally, I glued the card front to the base and then played with the swinging ghosts.  I hope you'll give this a try as it's a lot of fun!  Thank you so much for stopping by.


Friday, September 2, 2022

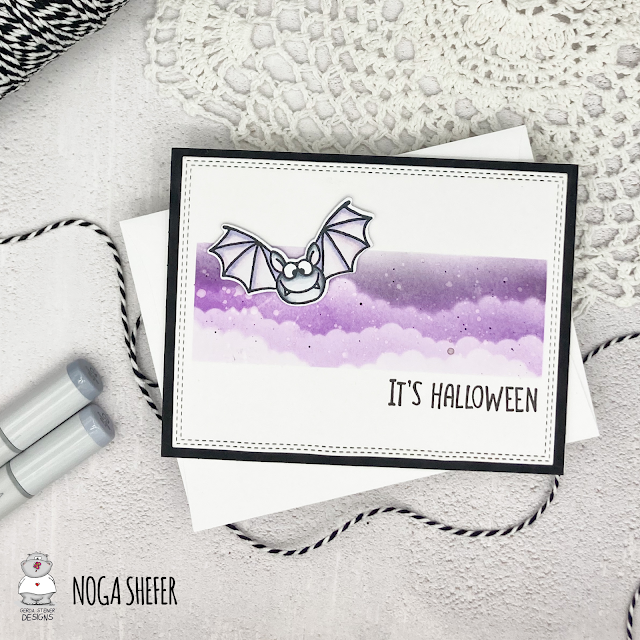
It's Halloween by Noga Shefer


Hi crafty friends,  Noga here and I am so happy to share with you another project for GSD today.


My card featuring the adorable Bats 4x6 Clear Stamp Set and Bats 4x6 Die Set.

To make this card I took an A2 panel of Bristol smooth cardstock.

I ink blended a background using  black soot, villainous potion  and wilted violet distress oxide inks with cloud stencil, splashed it with water and black paint on it.

Next I colored the cute image using copic markers and glued it to my panel with foam tape for dimension.

Next I stamped a greeting from Gourds 4x6 Clear Stamp Set using black ink.

I hope you enjoy the card I created and feel inspired to create!

Thanks for stopping by,