Tuesday, May 31, 2022

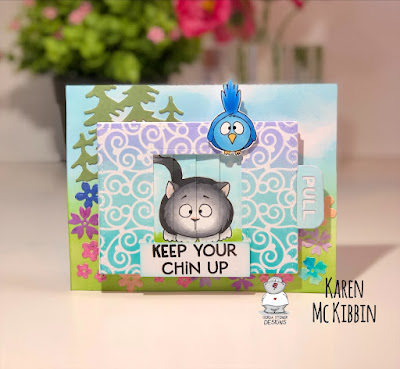
Chin Up Picture Changer Card


Hello, it's Karen here again, and I've got a picture changer card for you today.  Do you remember those? I've used a new stamp set from Gerda Steiner Designs called "What's Up" and had it change with one of the images in the All Cats stamp set.  Here's my card ...


The little bird perched on the front of the card is also from the What's Up stamp set.  I coloured all the images with Copic markers, before using the Lawn Fawn Magic Picture Die to cut them out.  After assembling the picture changer according to the instructions, I created the front coverplate by stencilling onto white cardstock using the Little Swirls stencil from Paper Rose Studio, and using Distress Oxide inks in Peacock Feathers, Salvaged Patina and Shaded Violet. 

For the background, I ink blended with Distress Oxide Mowed Lawn, and Cosmic Shimmer Colour Cloud ink in Clear Day.  I added in some trees that were diecut from green cardstock using the Alpine Trees die from Memory Box.  The flowers were leftovers from another card and are cut from the Spellbinders Petitie Floral Potpourri die set. Once the background was done, I mounted the picture changer on a double layer of foam and attached it to the background.  It's lots of fun changing the picture!

Thank you for stopping by and I hope you're having a great day!

Sunday, May 29, 2022

Grow happiness....!!

 Hi friends...

I've got another card to share with you today using the fabulous Grow happiness stamp set from Gerda Steiner designs!!

I really like this sweet stamp set, I like plants but let me tell you I'm not the greatest at actually keeping plants alive. I am trying some at the moment and so far they are still living so fingers crossed for them....

To create this card I started with white cardstock that I stamped with the CPD background stamp cozy plaid...

I then added a die cut grey frame using the notecard frame and tag die (also from Catherine Pooler) and adhered it using foam tape. I then used the same die and die cut the tag from white cardstock, added some grey twist time and stamped a sentiment on it from the Grow happiness stamp set. 

The tag was also adhered using foam tape, giving the card dimension!!


I stamped/coloured three images from the GSD Grow happiness stamp set using Spectrum noir tri-blend markers and fussy cut around them before adding to the tag...

Completing the card I added a touch of sequins, adhered using micro glue dots!!


Thanks for checking out my latest card, I hope you like it. 

Happy crafting, hugs Ashlee.

Saturday, May 28, 2022

You grow girl....!!

 Hey friends...

I've got some new Gerda Steiner inspiration for you all today and this card uses the Grow happiness stamp set!!

If you love plants and cute kitties you are going to love this stamp set...


To create this card I started with a plain white cardstock base and then added some inking using a stencil called Organic shapes from Create a smile stamps that I inked using Distress oxide inks in shades of green...

I then stamped on a sentiment from the Grow happiness set using Memento tuxedo black ink. 


I stamped/coloured two of the plants, fussy cut around them and then added to the card using foam tape so they popped up off the base. (These were coloured with a mix of Spectrum noir tri-blend markers and Couture creations alcohol markers)

To complete the card I finished it off with a touch of green sequins!!


I hope you like this CAS card. Thanks for stopping by the blog today and happy crafting. 
Hugs Ashlee

Thursday, May 26, 2022

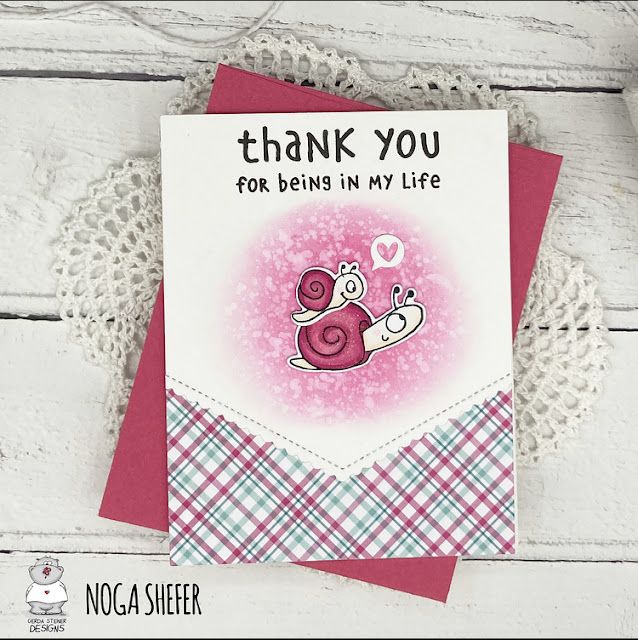
Fater's Day card by Noga Shefer

 Hi crafty friends,  Noga  here and I am so happy to share with you another project for Gerda Steiner Designs today.


Today this is a card for Fater's Day.

My card featuring the  adorable You Rock Bundle.
 
To make this card I took an A2 panel of plaid cardstock and panel of bristol smooth cardstock.

I sponged kitsch flamingo distress oxide ink on the Bristol smooth and  die cut a scalloped edge.

Next I colored the sweet images using copic markers and glued them to my panel with foam tape for dimension.

To finish off I stamped a greeting from Bunny Friends 3x4 Clear Stamp using black ink.

 I hope you enjoy the card I created and feel inspired to create!

Thanks for stopping by,

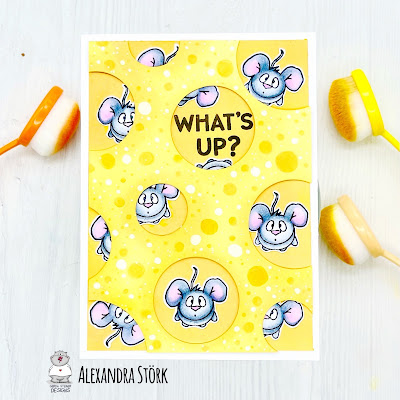
What´s up?

Hello, this is Alma and today I would like to eat a big piece of cheese with you!


I love the new What’s up 4x6 Clear Stamp Set by Gerda Steiner Designs! It‘s a must have for all pet owners!
I decided to create a cheese paradise for the cute mouse image of this stamp set!
First of all I coloured the mouse eleven times and cut it out.
For today's card I've chosen a rectangle layout. I cut 2 rectangles and wiped them with Distress Oxide Inks Shades of Wild Honey, Fossiliezed Amber and Squeezed Lemonade.


Then I punched the cheese pattern in the rectangle with circle dies in different sizes.
Finally I set some highlights with the Copic Y35 and the white gel pen.
After that  I assembled all the individual parts and stamped the text „What‘s up“ from the same set.
What do you think? Is this a paradise for all mice?!

Tuesday, May 24, 2022

Bug Me Anytime

Hi there,


it's Tanja here and I created this card using the super adorable Gerda Steiner Designs Ladybugs stamp set:

  • stamp three of the Gerda Steiner Designs Ladybugs with Lawn Fawn Jet Black
  • add color with Spectrum Noir Triblend Markers and extra shading with Faber-Castell Polychromos pencils
  • for the highlights use a white gel pen
  • stamp the sentiment from the same set with that same black ink
  • ink up the edges with Distress Ink Aged Mahogany and add little dots with a red fineliner
  • add strips of black cardstock and patterned paper to the top and bottom of the panel before adhering it to a cardbase
  • add sequins and Nuvo Glitter Drops White Blizzard for extra sparkle and shine


I hope you got inspired.


Hugs,


Sunday, May 22, 2022

What's Up?

Hi everyone! It’s Jeannie (InsideoutJeans) on the blog today with Gerda Steiner Design’s stamp set named, What's up?. It's such a cute set with four different animals and I love their expressions!


I stamped and colored these images and decided that I just had to stack them on top of each other because it would be super cute and funny. After coloring them, I fussy cut them out or you can use the coordinating dies

To create my background, I used the fence in the Hoppiness stamp set -- and stamped it three times so it could span the width of my A2 card base. I colored the entire background with copic markers as well, adding in some texture for the grass blades. For the sky, I created fuzzy lines and blended it out. It didn't look great while I was coloring them in but it turned out nicely. 


To finish off the card, I stamped the sentiment and I'm so amused how this came together. Hope you enjoy it as well. 


Thanks for stopping by today and I hope you get inspired to create. Come back again soon for more inspiration and ideas! Happy Crafting! 


Tuesday, May 17, 2022

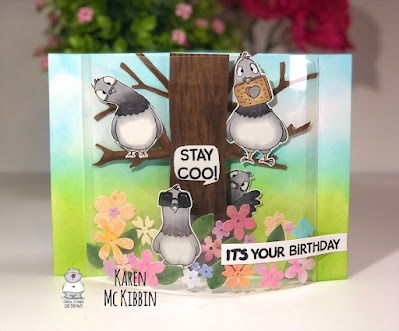
Pigeon Acetate Bendy Card with *Video*

Hello everyone, it's Karen here again today.   I’ve got a fun new card fold idea for you today, using the adorable “Pigeons” stamp set from Gerda Steiner Designs. This is a 5” x 7” card that folds flat, but pops out to create a 3D card when it comes out of the envelope. There’s room on the back of the card to write a message and to decorate if you want. I have to give a shoutout to Sam Calcott of Mixed Up Craft who I first saw make this style of card.  I've got a link in the video description to her video which is well worth seeing.  Here’s a look at my card. 


Back of the card

Bottom view of the card showing dimension
 
I’ve made a video for you to show how this card was made. There are no special dies required, and it’s really not a difficult card to make. But it does have lots of dimension and a little bit of movement of the pigeons. So if you would like to see the video, please CLICK HERE

Thank you so much for stopping by and I hope you’re having a fun, creative day!


Friday, May 13, 2022

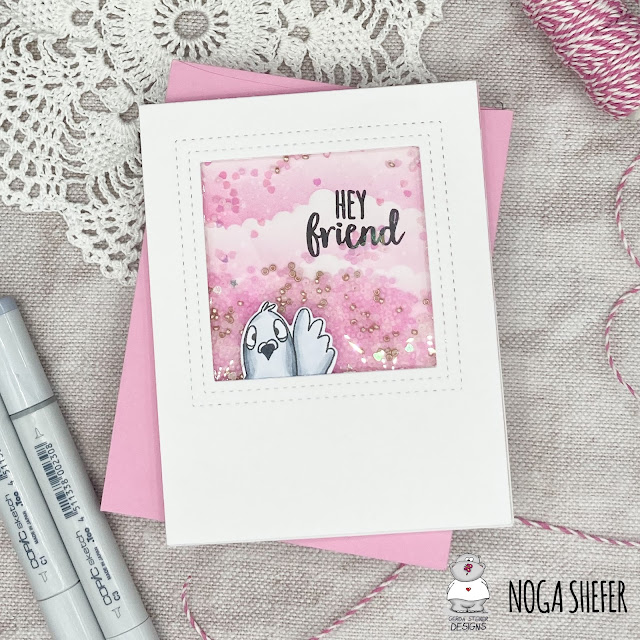
Hey friend by Noga Sefer


Hi crafty friends,  Noga  here and I am so happy to share with you another project for Gerda Steiner Designs today.


 My card featuring the  brand new adorable  Pigeon Bundle Set.

To make this card I took an A2 panel of Bristol smooth cardstock. 
For the background, I die cut the double stitch window die out of white cardstock. 
Behind it, I ink blended a background using distress oxide in kitsch flamingo with cloud stencil, splashed it with water and clear shimmer spray  and glued it behind the window cover panel with foam tape.

than I created a shaker  and filled it with sequins.

Next I colored the adorable image using copic markers and glued it to my panel.

To finish of  I stamped a greeting from Foxes 4x6 Clear Stamp Set using black ink.

I hope you enjoy the card I created and feel inspired to create!


Thanks for stopping by,

Tuesday, May 10, 2022

Home is where the Heart is

Hi there,

it's Tanja here and I created this sweet card using the Gerda Steiner Designs Pigeons stamp set:

  • stamp one of the pigeons from the Gerda Steiner Designs Pigeons set with Lawn Fawn Jet Black
  • color the image with Spectrum Noir Triblend Markers
  • add extra shading with Faber-Castell Polychromos pencils and highlights with a white gel pen
  • add some shine with clear Wink of Stella
  • create a background on a panel cut from smooth white cardstock with the help of the Lawn Fawn Happy Village set - use the masking technique
  • color the image with Spectrum Noir Triblend markers and Faber-Castell Polychromos pencils as well
  • stamp the sentiment from that same Lawn Fawn set with Versafine Vintage Sepia
  • add strips of kraft cardstock to the left and right side of the panel before adhering it to a cardbase


I hope you got inspired. 


Hugs,


Tuesday, May 3, 2022

Garden Critters Thank You Card

Hello and welcome back, it's Karen here today.  I’ve got a thank you card to share today that combines the Garden Critters and Happy Bee-day stamp sets.


I used Copic markers to colour in all the poppies and the caterpillar, and then fussy cut them out.  The extra leaves are from the HoneyBee Stamps "Lovely Layers Coneflower" die set and I cut them from green cardstock and added some Distress Oxide Rustic Wilderness and Mowed Lawn to them.  The white circular die is from PinkFresh Studio and is the "Stitched Scallop Circle" die set, and I chose to use both the inside and outside die cuts.  I stacked about four of these die cuts together to create some dimension. The sentiment is from the Garden Critters stamp set and I heat embossed it with clear embossing powder (please try not to notice that I didn't cut it quite straight! It drives me crazy 😬).

For the background, I used some Cosmic Shimmer Colour Cloud ink in Lemon Meringue, Baked Peach and Lush Pink and just ink blended them over the card front. Then I sprinkled on some Pixie Sparkles in Pumpkin Patch and misted with water.  There's a lot of sparkle in real life from these, but it doesn't show up in the picture. 

Finally, to put it all together, I glued down the leaves where I wanted them to go, but left the upper edges free to be curled up slightly.  Then I glued the white circle die cuts down in place, before adding in the poppies.  I mounted the caterpillar on foam tape and positioned him at the bottom of the circle.  I also mounted the sentiment on foam tape and adhered it below the image.

Thank you for stopping by, and I do hope you're having a happy, creative day!


What's up?

Hi there,

it's Tanja here and I created this fun card using the Gerda Steiner Designs What's up stamp set:

  • stamp the cat and the mouse from the Gerda Steiner Designs What's up set with Lawn Fawn Jet Black
  • color the images with Spectrum Noir Triblend Markers 
  • add extra shading with Faber-Castell Polychromos pencils and highlights with a white gel pen
  • stamp the sentiment from the same set into a speech bubble with Versafine Clair Morning Mist and heat-emboss it with clear embossing powder
  • use an embossing folder and Distress Ink Hickory Smoke to create a brick backdrop
  • use a strip of grey cardstock as ground
  • create a subtle background using stamps from the Lawn Fawn Critter Chatter: Pets set and second generation stamping with Versafine Clair Nocturne


Thanks for stopping by.

Hugs,