Tuesday, September 28, 2021

You are my boo! - Larissa


Hi everyone, I am Larissa from Car-d-elicious and today it is my turn again to post a card on the blog from Gerda Steiner designs and this time I have made a halloween card with the digital stamp You are my boo! ghost from Gerda Steiner designs. I have coloured the image with my Polychromos pencils and the black glaze pen and then I have fussy cut the image.

With the Crea-nest-lies XXL 76 from Crealies I have cut a rectangle from white cardstock. I used Shaded lilac, Wilted violet, Dusty concord and Black soot Distress ink to create a background for my image. With the help of the Slimline halloween stencil (PS8108) from Marianne design and Versafine clair nocturne ink I added a couple of bats on the background. I used a White Posca pen to add paint splatters on the background. I have glued the background on a white card and then I added the image with foamtape on the card. I have coloured the ghost and all the bats with the Clear Spectrum noir sparkle glitter pen. I have cut the sentiment from white cardstock with the Smalt alfabet (D190603) from Gummiapan and then I glued it above and below the image on the card.


*********************************************************************************
STAMP: You are my boo! ghost from Gerda Steiner designs
COLORING MEDIUM: Polychromos pencils, Distress inks
PAPER: White cs
INK: Versafine clair nocturne, Shaded lilac, Wilted violet, Dusty concord and Black soot Distress ink
DIES: Crea-nest-lies XXL 76 from Crealies, Smalt alfabet (D190603) from Gummiapan
ACCESSORIES: Black glaze pen, Clear Spectrum noir glitter sparkle pen, White Posca pen, Slimline halloween stencil (PS8108) from Marianne design

I am a participant in the Gerda Steiner designs Affiliate Programme. This means that if you click on one of my links and subsequently make a purchase, I will receive a small commission of store credit, at no extra cost to you.

Sweet potato....!!

Hey friends...

I'm back with another card using the fun Yam's and Corn stamp set....

This one is a CAS design where I used a stencil on the card base to create some ink blended lines with CPD ink and then above I added the You're my sweet potato sentiment stamped with Memento tuxedo black ink!!
 
I stamped two Yams also with the same Memento ink and then coloured them with alcohol markers from Parkoo shop...

To finish the card off I added some sequins for a tiny little bit of bling!!

I hope you enjoyed this CAS design and feel inspired to get crafty...
Till next time, Hugs Ashlee

Monday, September 27, 2021

You're a-maize-ing....!!

  Hi friends...

I have some new inspiration for you today using the awesome new set Yams & Corn...

These corn images are just the cutest aren't they, such fun little characters I couldn't wait to colour them up and get them on a card!!

For this one I wanted to create a slimline card so I could fit on three of the sweet corns...


I coloured up all the images using Parkoo shop alcohol markers...

The background paper I made by stamping one of the stamps from the Yams and Corn set onto yellow cardstock with some CPD ink!!

The sentiment is embossed on black cardstock using WOW! Opaque bright white embossing powder, I love using this technique for sentiments on my cards...

(All the dies used to create this card are from Uniquely Creative)

I hope you enjoy this new card, I will be back with another card using this stamp set this week so keep an eye out for that too!!

Happy crafting, hugs Ashlee

Sunday, September 26, 2021

You're special

Hi, Margreet here, and today I am posting a card on the Gerda Steiner Designs blog.
I am showing a card that I made with the digital stamp Cold Hedgehog.
I started with printing the digital stamp on Perfect Colouring Paper and then coloured it with copic markers. Then I fussy cut the image. With a white gelpen I have added dots on the cheeks and scarf of the hedgehog.
For the base I have used a black card and added a layer of orange/brown paper from the Basic Grey 6x6 scrapbook designer papers. I trimmed the borders with the Tim Holz deckled trimmer and distressed the edges with black soot distress ink.
The spider's web border was cut in black and placed underneath the hedgehog, who was glued with foamtape.
I stamped the text "You're special" (an old Hero Arts stamp) with the colour Habanero from Versafine. The borders were distressed with distress ink Black Soot.
Have a great day!
xxx Margreet


Friday, September 24, 2021

Halloween Card by Noga Shefer


Hi crafty friends,  Noga here and I am so happy to share with you another project for GSD today.


 My card featuring the adorable Ghosts Stamp Set , Ghosts Die Set Gourds 4x6 Clear Stamp Set and Gourds Die Set.

I love to make Halloween cards so much!

To make this card I took an A2 panel of Bristol smooth cardstock.

The background was created by blending dried marigold distress oxide ink.
I also splashed black paint on it  and glued a black scallop frame.

Next I colored the cute image using copic markers and glued it to my panel with foam tape for dimension.

Next I stamped a greeting from this stamp set using black ink.

I hope you enjoy the card I created and feel inspired to create!

Thanks for stopping by,

Tuesday, September 21, 2021

Oh My Gourd Birthday Card

Hello, it’s Karen here again and thank you for stopping by. I’ve got a fun, interactive card today that features a new stamp set from Gerda Steiner Designs called Gourds.  I would like to point out that I made my card say “It’s Your Birthday” on the inside, but it could just as easily have said “It’s Halloween”, as that sentiment is also in the set. Here’s a look at the card:


I started by stamping and copic colouring the adorable gourds and some of the ghosts from the Ghosts stamp set. I love that with both of these sets, there are so many images with different expressions to choose from.  I meant to write down the copic markers that I used but I think I was too excited to colour the images and forgot, so I do apologize. 

I started by stamping the inside sentiment onto my card base, as I usually forget to do this while it’s easy to do.  On the front of the card, I used a piece of cardstock from the Happy Haunting collection from Craft Consortium for the background, but you could just as easily create an ink blended background.  I added a little Nuvo shimmer pen to the moon and stars. The next step was to use the Swish ‘n Pop Pull Tab die set from Lawn Fawn to add the interactive element on this card. I used the die as instructed by Lawn Fawn with the one exception that I modified it to allow me to have two ghosts swing up. To do that, I added a small strip of packaging acetate with double sided tape, to the long die cut arm. Here’s a picture of what that looked like to help make it clearer. 


I played around a little with the placement of this second ghost to be sure he would start by being hidden behind the tree and end up above the gourds. It really just meant I needed to add some bulk to the tree so it would hide the second ghost. The tree is from an Elizabeth Craft Tree die set and I used a cloud die I had to cut out some of the bushy leaves. I also stamped and cut out a few extra ghost faces to have them hiding in the tree. 

To cover the interactive mechanism, I used a border die to cut out a black foreground for the gourds to sit on.  I stamped the sentiment along the bottom and white heat embossed it. Next, I used a double layer of foam tape to pop up this layer onto the card front, and was careful to make sure I didn’t interfere with the movement of the mechanism. Finally, I attached the tree, again making sure the ghosts were hidden in the starting position. I was able to add some double layers of foam tape in the top right hand corner to help support the tree without disrupting the mechanism. Then I glued the gourds in place. Finally, I die cut the pull tab cover from a scrap of the background cardstock and adhered it with glue to the pull tab.  Then all that was left to do was to play with the pull tab and watch the ghosts come out! 

Thank you so much for stopping by and I hope you’re having a happy, creative day! 

Pumpkin bear - Larissa


Hi everyone, I am Larissa from Car-d-elicious and today it is my turn again to post a card on the blog from Gerda Steiner designs. Today I am showing a card that I have made with the cute bear from the clear stamp set Pumpkin bear from Gerda Steiner designs. I have coloured the bear with my Polychromos pencils, a black glaze pen and a white gelpen. I have fussy cut the image. With the white gelpen I have added dots on the scarf from the bear. 


On a white card I have glued a layer of dark brown paper and then I added a layer of plaid paper from the Perfectly plaid Fall petite paper pack (retired) from Lawn fawn. I have cut a circle from the dark brown paper wit the Crea-nest-lies XXL 33 from Crealies. From the same dark brown paper I also have cut a strip with the Strips met stiklijn (CLmix12) from Crealies. On the strip I have stamped a sentiment from the set So much to say (retired) from Clearly besotted with Versamark ink and then I embossed it with white embossingpowder.  I have glued the strip on the card and then I added the circle with foamtape. I have used foamtape to glue the bear on the card. With the Crea-nest-lies XXL 59 from Crealies I have cut a little banner from dark brown cardstock and after I glued it on the card. I have added a little flower that I have cut from the plaid paper with the Layered floral die set (Die047-j) from Impression obsession. I have decorated the flower with a brown diamond painting gem.


*********************************************************************************
STAMP: Pumpkin bear from Gerda Steiner designs, So much to say (retired) from Clearly besotted
COLORING MEDIUM: Polychromos pencils
PAPER: White and dark brown cs, Perfectly plaid Fall petite paper pack (retired) from Lawn fawn
INK: Versafne clair nocturne, Versamark ink
DIES: Crea-nest-lies XXL 33 and 59 from Crealies, Strips with stitchline (CLmix12) from Crealies, Layered floral die set (Die047-j) from Impression obsession
ACCESSORIES: Black glaze pen, white gelpen, Brown Diamond painting dot, White embossingpowder

I am a participant in the Gerda Steiner designs Affiliate Programme. This means that if you click on one of my links and subsequently make a purchase, I will receive a small commission of store credit, at no extra cost to you.

Shine Bright

Hi there,

I created this adorable card using the Gerda Steiner Designs Hello Sunshine stamp set:

  • stamp the bear and the sentiment from the Gerda Steiner Designs Hello Sunshine set with Lawn Fawn Jet Black
  • color the image with Spectrum Noir Triblend Markers and add extra shading with Faber-Castell Polychromos pencils
  • add highlights with a white gel pen
  • create a background on a piece of Neenah Desert Storm Kraft Cardstock using Distress Oxide Ink Mustard Seed and the Create a Smile Focal Point stencil
  • ink up the edges of the panel with Distress Ink Gathered Twigs
  • embellish the card with some yellow sequins in two different sizes and add Nuvo Glitter Drops White Blizzard to their centers


Thanks for stopping by.

Hugs,


Wednesday, September 15, 2021

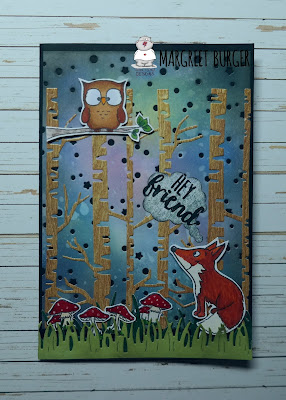
Hey Friend

Hi, Margreet here and today I am posting a card on the Gerda Steiner Designs blog.
This time I have made an autumn card with clearstamp set Foxes.
To make this card I started with blending various distress oxide inks and sprayed some water over it and soaked it up with a piece of kitchen paper.
Then I used a die full of dots and stars to give it an evening look.
Next I stamped the images and colored them with copic markers. Then I fussy cut them out.
The die with trees was used on woodgrain papers and glued on the background.
The grass was made with a Craftables from Marianne Design.
The cute fox and owl were glued with foam tape for some dimension.
For the text I used a paper leftover, stamped it with black ink and cut it out with a text balloon die from Craft Emotions.
And here the complete card again.
Hope you got inspired to use this fun set.
Have a great day!
xxx Margreet


Tuesday, September 14, 2021

Dog dressed as ghost - Larissa


Hi everyone, I am Larissa from Car-d-elicious and today it is my turn again to post a card on the blog from Gerda Steiner designs. This time I have made a halloween card with the digital stamp Dog dressed as ghost from Gerda Steiner designs. I have coloured the image with my Polychromos pencils and the black glaze pen and then I have fussy cut the image. 


I have followed a mini tutorial from Francine Vuillème for my card. I have torn a hole out of my masking paper and then I placed it on the front of a white card. Then I used Distress ink to create a spooky background. I have used Wild honey, Carved pumpkin, Rustic wilderness and Black soot Distress ink for the background. With a Black posca pen I have applied paint splatters on the card. I have glued the image with foamtape on the card. I have stamped a sentiment from the set Haunt it from Reverse confetti on the card. Unfortunately there are some splatters around the sentiment, so it is a bit more difficult to read. I stamped a couple of stars from the set Ghostly greetings from Hello bluebird on the background. I have drawn lines around the edges of the card with a black fineliner. 


*********************************************************************************
STAMP: Dog dressed as ghost from Gerda Steiner designs, Haunt it from Reverse confetti, Ghostly greetings from Hello bluebird
COLORING MEDIUM: Polychromos pencils, Distress inks
PAPER: White cs
INK: Versafine clair nocturne, Wild honey, Carved pumpkin, Rustic wilderness and Black soot Distress ink
ACCESSORIES: Black glaze pen, Black posca pen, Black fineliner, Masking paper

I am a participant in the Gerda Steiner designs Affiliate Programme. This means that if you click on one of my links and subsequently make a purchase, I will receive a small commission of store credit, at no extra cost to you.

Thanks a Melon

Hi there,

it's Tanja here and I created this thank you card with the Gerda Steiner Designs Melon Friends stamp set:

  • stamp the dragon and the melon border from the Gerda Steiner Designs Melon Friends set with Lawn Fawn Jet Black
  • color the images with Spectrum Noir Triblend Markers and add extra shading with Faber-Castell Polychromos pencils
  • add extra texture with a black gel pen and highlights with a white gel pen
  • create a background on a piece of watercolor paper using Distress Ink (Festive Berries, Picked Raspberry), acetate and a Mini Mister
  • stamp the sentiment from the same set with Versafine Clair Nocturne 
  • add a strip of patterned paper to the top and bottom of the panel before adhering it to a cardbase


I hope you got inspired.


Hugs,


Sunday, September 12, 2021

All the Fall sets!

Hi everyone! It’s Jeannie (InsideoutJeans) on the blog today with Gerda Steiner Design’s newest fall stamp sets named, Yams and Corn along with Gourds.

I was inspired by the Red, Yellow, and Purple color palette that I saw on an episode of Craft Roulette. They didn't love it, but I thought it was a perfect one for fall.

For my first card, I used the yellow and red along with the Curls stencil to create a ombre look for the background. I used the purple to ink up the edges of the cardstock that I matted the background on. These yams were so adorable and I colored them in a purple shade.


For my second card, I decided to do a super colorful background with the same stencil for some interest. I did do a bit of fussy cutting for the gourds but I thought it worked so well with the background to really make it pop. I just love their expression ... they are so funny! 


These two sets are so fun and I can't wait to create more with them. 


Thanks for stopping by today and I hope you get inspired to create. Come back again soon for more inspiration and ideas! Happy Crafting! 


Tuesday, September 7, 2021

Little Reindeer Christmas Card

Hello and welcome, it’s Karen here again today.  I have a Christmas card to share, and I do hope it’s not too early for you. It features the sweet “Little Reindeer” from Gerda Steiner Designs and he seems to have got himself a little tangled up in the Christmas lights. 


I coloured the reindeer image with copic markers and then added glossy accents to all the lights and ornaments before setting it aside to dry.  While it was drying, I created the background by die cutting two borders of snowflakes from a Crafters Companion die set called Joyful Snowflakes.  Although you can’t see it in the photo, I spritzed these with some Sheer Shimmer craft spray in Sparkle.  I rotated one panel to go across the top of my card front and placed the other along the bottom edge.  I die cut 5 layers of the circular Paper Rose Geo Mandala from red cardstock and glued these together.  I used the same red cardstock for the sentiment, which is from the “Reindeer and a Tree” stamp set, and white heat embossed the sentiment.  Finally, I glued the mandala circle to the front of the card and popped the reindeer up on foam tape inside the circle. The sentiment is also on foam tape.  So another quick and simple card today!  

Thank you for stopping by and I hope you’re having a great day! 

Owl rather be with you - Owl you doing - Larissa


Hi everyone, I am Larissa from Car-d-elicious and today I am posting a new card on the blog from Gerda Steiner designs. This week I have made a card with the clear stamp set Owl rather be with you from Gerda Steiner designs. I have stamped one of the owls and then I coloured the image with my Polychromos pencils and the black glaze pen. I have fussy cut the image. 


With the Crea-nest-lies XXL 49 from Crealies I have cut a circle from green patterned paper from the Spring chic paperpack (retired) from Me to you and I glued it on a kraft card. I used 2 smaller circles dies from the set Crea-nest-lies XXL 49 from Crealies and I used them cut a circle frame from kraft cardstock. I have glued the image on the circle with the patterned paper and then I glued the circle frame on top of it. I used a black fineliner to doodle lines on the edges of the kraft card. From black cardstock I have cut a funny sentiment with the Alphabet 2 Lowercase (1075-retired) from Elizabeth Craft and I glued it under the image on the card.


*********************************************************************************
STAMP: Owl rather be with you from Gerda Steiner designs
COLORING MEDIUM: Polychromos pencils
PAPER: Kraft cs, Spring chic paperpack (retired) from Me to you
INK: Versafine clair nocturne
DIES: Crea-nest-lies XXL 49 from Crealies, Alphabet 2 Lowercase (1075-retired) from Elizabeth Craft designs. Heart confetti die from Alexandra Renke
ACCESSORIES: Black glaze pen, Black fineliner

I am a participant in the Gerda Steiner designs Affiliate Programme. This means that if you click on one of my links and subsequently make a purchase, I will receive a small commission of store credit, at no extra cost to you.