Saturday, July 31, 2021

Monster Fun

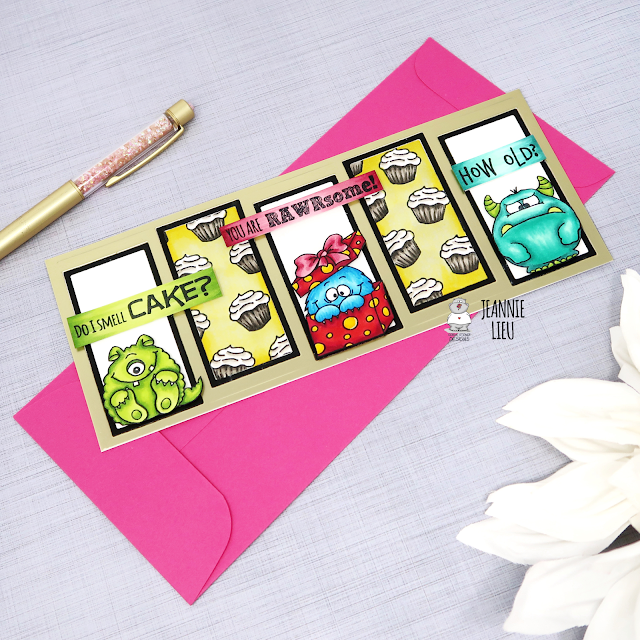
Hi everyone! It’s Jeannie (InsideoutJeans) on the blog today with Gerda Steiner Design’s stamp set named, Monster Fun. This is such a fun set that I haven't used in awhile and I always love pulling out older sets.


Since there are three monsters in this set, I pulled out a Slimline Staggered Rectangle die to be my base for this card. I cut it out of gold, black and white cardstock. I used the gold for the main base, the black cardstock for the frames and the white cardstock for the rectangles. I covered two of the five white rectangle with the cupcakes from the stamp set. 


I placed each of the monsters on the outside and middle rectangles and the cupcake rectangles in between them. I really couldn't decide on which sentiment I wanted to use, so I ended up using three of them and it worked perfectly. 

It's such a cute birthday card, isn't it? I just love it. 

Thanks for stopping by today and I hope you get inspired to create. Come back again soon for more inspiration and ideas! Happy Crafting! 


Friday, July 30, 2021

Love and Wishes....!!

 Hey crafty friends...

Ashlee here, I've got a card to share today featuring the beautiful flowers from the "Happy bee-day" stamp set (One of my absolute fave GSD sets) along with a heat embossed sentiment from the "Sending hugs" stamp set....


I love being able to to add bold embossed sentiments to my cards, It's always such a lovely result when heat embossing them!!

The sentiment is embossed with WOW! metallic gold rich pale embossing powder....

The flower images were stamped directly onto a white card base with some ink splatters over the top. I then added the sentiment that I fussy cut and finished it off with some Pinkfresh rhinestone!!

I hope you like this new card...
Till my next post happy crafting, hugs Ashlee 

Wednesday, July 28, 2021

Christmas in July with Rocking Santa


Hello, Margreet here with a card for Christmas in July with digital stamp Santa playing Guitar.  
I made the background with Amsterdam acrylic paint on the gelliplate. 
I used the Christmas Song set by Marianne Design and 
cut the text in pieces and distressed with black soot distress ink. The word Christmas is die cut 3x and glued together in order to create some volume.

I printed the digistamp onto Perfect Colouring Paper, coloured Santa with copic markers and then fussy cut him.
I put some washitape under his feet to ground him.

Thanks for stopping by and have a nice day!
xxx Margreet


Whale party....!!

Hey everyone...

It's Ash here, I've got a new slimline card to share today and this one uses the stamp set called "A whale of a time" which happens to be retiring so if you have your eyes on this set snap it up while you can!!


For this card I started with a base of synthetic paper and inked it up with some alcohol inks and used a felt blender to create a fun effect...

I then got a piece of watercolour cardstock and did some watercolour effects with Twilight Catherine Pooler ink before stamping on some of the cute whales from the whale of a time set!!

I fussy cut them out and added to the base with foam tape for dimension. 

For the sentiments I heat embossed with WOW! Silver embossing powder on black cardstock and fussy cut that also. Using some more WOW! embossing powder I heat embossed a couple pieces of white cardstock one with a mix of WOW! powders that I mixed together and the other using Bubblicious a new powder from the "Pink-a-licious" trio...

Using the embossed pieces I die cut the party die from each piece and then layered the pieces inside for two different colours!!

I finished it off with a touch of sequins, my usual last touch to nearly all my cards hehe...
I hope you like it!!

Happy crafting, hugs Ashlee

Tuesday, July 27, 2021

Moose Birthday Card

Hello it’s Karen here again and thank you for stopping by! I’ve got a simple, one layer, masculine birthday card to share with you today. 


I love this Moose Love stamp set from Gerda Steiner Designs.  The expression on that moose is just priceless! 

I started this card by stamping the moose in a copic friendly ink in roughly the center of my card.  I flicked the grasses on with copic markers (listed below), and just tried to leave a few areas around the moose’s legs to fill in later. I used quite a few shades of yellow-green to add some variation to the grass.  Next, I coloured in the moose and lightly flicked some lighter brown shades down into the grass to help give the image that he was standing in the grass.  I then added some more flicks up around his legs in the grassy colours to finish colouring him in.  I added a few red dots around the grass to look like wildflowers, and used a copic multiliner pen to draw in the fly.  After masking off the moose, I stencilled in the cloudy sky using the Cloud Edger stencil from A Colorful Life Designs. Finally, I stamped and clear heat embossed the sentiment which is in the Moose Love stamp set, before adhering my card front to a card base.  This was a super quick and simple card to make and I think it’s great for a masculine card, so bonus!!

Thank you so much for stopping by and I do hope you’re having a great day! 

Copic markers used:

Moose: E79, E59, E57, E53, E51, E33, R20, R00

Grasses: YG97, YG95, YG63, YG00, R29, R24


Hello sunshine - Larissa


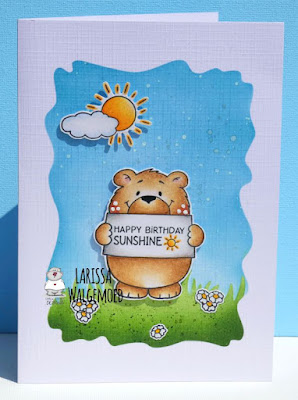
Hi everyone, I am Larissa from Car-d-elicious and today I am posting a new card on the blog from Gerda Steiner designs and this time I have made a card with the clear stamp set Hello sunshine from Gerda Steiner designs. For my card I have stamped the images of the bear and the sun and cloud and then I coloured them with my Polychromos pencils, the black glaze pen and a white gelpen. I have coloured both suns with the Clear Spectrum noir sparkle glitter pen. I have fussy cut both of the images. 

On a white card I made a background for my images with the Watercolor wash rectangle stencil from My favorite things. The sky is made with Tumbled glass and Broken china Distress ink. I used white acrylic paint and Frost white all-purpose ink from Tsukineko to add some tiny paint splatters. For the grass I have used the Grassy hillside stencils from Lawn fawn and Mowed lawn and Rustic wilderness Distress ink. I have added paint splatters with the Rustic wilderness Distress ink. I glued the images with foamtape on the card. I stamped a little flower from the set Hello spring from Gerda Steiner designs a couple of times and also added those on the card in the grass.


*********************************************************************************
STAMP: Hello sunshine and Hello spring from Gerda Steiner designs 
COLORING MEDIUM: Polychromos pencils, Distress inks
PAPER: White cs
INK: Versafine clair nocturne, Tumbled glass, Broken china, Mowed lawn and Rustic wilderness Distress ink
ACCESSORIES: Black glaze pen, White gelpen, Clear Spectrum noir glitter sparkle pen, Watercolor wash rectangle stencil from My favorite things, Grassy hillside stencil from Lawn fawn, White acrylic paint, Frost white all-purpose ink from Tsukineko. 

I am a participant in the Gerda Steiner designs Affiliate Programme. This means that if you click on one of my links and subsequently make a purchase, I will receive a small commission of store credit, at no extra cost to you.

Thursday, July 22, 2021

Hello Sunshine by Noga Shefer

Hi crafty friends,  Noga here and I am so happy to share with you another project for Gerda Steiner Designs today.


My card featuring the adorable Hello Sunshine 4x6 Clear Stamp Set .


To make this card I took an A2 panel of Bristol smooth cardstock.

The background was created by blending tumbled glass and old paper distress oxide inks with grass die.


Next I colored the cute images using copic markers and glued it to my panel with foam tape for dimension.


For a final touch, I added white frame.


I hope you enjoy the card I created and feel inspired to create!

Stay safe and healthy!


Tuesday, July 20, 2021

Decorating penguin - Merry christmas - Larissa


Hi everyone, I am Larissa from Car-d-elicious and today it is my turn again to post a card on the blog from Gerda Steiner designs. Because it is july I decided to make a christmas card for Christmas in july. This way I should have a nice stash of christmas cards ready in december. ;)


I have made a mini slimline card with the digital stamp Decorating penguin from Gerda Steiner designs. I have coloured the image with my Polychromos pencils and the black glaze pen. I have coloured the lights with the Clear Spectrum noir sparkle glitter pen and then I coloured them with a Clear glaze pen. I have fussy cut the image. With the Mini slimline Wonky stitched dies from Kat Scrappiness I have die-cut a rectangle from white cardstock. I have glued the rectangle on a rectangle that I have cut from green cardstock. Then I glued the rectangles on a pink mini slimline card. I have stamped a sentiment from the stamp set Simple script from Clearly besotted stamps. I have glued the strip with the sentiment on green cardstock and then I glued them together on the card. I have added the image with foamtape on the card. I cut a couple of stars from pink cardstock with the Star confetti die from Alexandra Renke and then I glued those around the image on the card. 


*********************************************************************************
STAMP: Decorating penguin from Gerda Steiner designs, Simple script from Clearly besotted stamps
COLORING MEDIUM: Polychromos pencils
PAPER: White, green and pink cardstock
INK: Versafine clair nocturne
DIES: Mini slimline Wonky stitched dies from Kat Scrappiness, Star confetti die from Alexandra Renke
ACCESSORIES: Black and clear glaze pen, Clear Spectrum noir glitter sparkle pen.

I am a participant in the Gerda Steiner designs Affiliate Programme. This means that if you click on one of my links and subsequently make a purchase, I will receive a small commission of store credit, at no extra cost to you.

Tuesday, July 13, 2021

Thanks a Melon Slimline Card

Hello, it’s Karen here again.  I’ve got a watermelon filled card today which just felt right on this hot summer day.  I’ve used the Melon Friends stamp set from Gerda Steiner Designs which has to be one of the cutest sets out there.


I stamped the images onto some Neenah Solar White cardstock and then used copic markers to colour them in.   I’ve listed the markers I used down below.  I ended up stamping about three of the dinosaurs and two of the bears.  I used circle dies in different sizes to cut areas out of the images, and just tried to offset where the images were in the circles.  To create the white frames, I used low tack tape to tape together the same circle die used to cut out the image, and a die that was a size smaller.  I cut two of each of these frames, and glued them together before gluing them to the circle image.  I saved the centers of the frames to colour in with copic markers and then added some of these between the circle images.  I diecut the frame from red cardstock using the Trinity Stamps Wonky Stitched Wilderness die set and made it three layers thick.  To assemble the card, I attached the red frame first, then spaced out the images and finally added in the coloured circles and the sentiment.  I popped up the two larger circles on foam tape to allow everything to fit on my card.  Finally, I glued the remaining images to the inside of the card along with the inside sentiment.  

Thank you so much for joining me and I hope you are having a great day!

Copic markers used:

Dinosaur - YG17, YG03, YG01, YG21, YG0000

Bear - R20, E34, E53, E51

Watermelon - R29, R35, YG67, YG01, YG0000


Sunday, July 11, 2021

Melon Friends

Hi everyone! It’s Jeannie (InsideoutJeans) on the blog today with Gerda Steiner Design’s stamp set named, Melon Friends.


I love how this stamp set comes with a watermelon border so I used it to create a little frame for my bear. I stamped one border on top and one on bottom.


Using a black pen, I just drew a line to create that frame. I stamped the bear holding the watermelon right in the middle with the sentiment below him. It's a super simple card but I hope you get some inspiration from it!


Thanks for stopping by! Happy Crafting!

Thursday, July 8, 2021

You're my cup of tea by Noga Shefer

 Hi crafty friends, Noga  here and I am so happy to share with you another project for Gerda Steiner Designs today.


My card featuring the adorable Positivi-Tea 4x6 Clear Stamp Set stamp set. How cute is this mouse??

To make this card I took an A2 panel of Bristol smooth cardstock and cut it with circle die.
For the background, I die cut the scallop frame die out of white cardstock. 
I ink blended a background using Distress Oxide in spun sugar and glued it on the pink circle.
Next I colored the sweet image using copic markers. I glued it to my panel with foam tape for dimension.

Next I stamped a greeting from this stamp set using black ink.

For a final touch, I added some hearts.

I hope you enjoy the card I created and feel inspired to create!

Thanks for stopping by,


Tuesday, July 6, 2021

Christmas in july - Fa-la-la-llamas - Larissa


Hi everyone, I am Larissa from Car-d-elicious and today it is my turn again to post a card on the blog from Gerda Steiner designs and this time I have made a christmas card with the image of the kid llama from the digital stampset Fa-la-la-llamas from Gerda Steiner designs. I know it is very soon to make a christmas card, but I always try to start early, so I will be finished with making cards before december and that way my december is so much more relaxed! I have printed the image and then I coloured it with my Polychromos pencils, the black glaze pen and a white gelpen. I have fussy cut the image. I have coloured the christmas lights and the white parts of the christmas hat with the Clear Spectrum noir sparkle glitter pen and then I applied Crystal glaze from Nuvo on it. 


With the Crea-nest-lies XXL 36 from Crealies I have die-cut the rectangle from green patterned paper from the Candy land paperpack (retired) from My favorite things and then I glued it on a white card. I have glued the image with foamtape on the card. I have stamped a sentiment from the clearset Christmas characters from Clearly besotted stamps n white cardstock and then I cut it into a bannershape. With a black fineliner I added faux stitching on the banner and then I glued it with foamtape on the card. I decorated the card with a couple of white pearls. 


*********************************************************************************
STAMP: Fa-la-la-llamas from Gerda Steiner designs, Christmas characters from Clearly besotted stamps
COLORING MEDIUM: Polychromos pencils
PAPER: White cs, Candy land paperpack (retired) from My favorite things 
INK: Versafine clair nocturne
DIES: Crea-nest-lies XXL 36 from Crealies
ACCESSORIES: Black glaze pen, White gelpen, Clear Spectrum noir glitter sparkle pen, Crystal glaze from Nuvo, White pearls, Black fineliner

I am a participant in the Gerda Steiner designs Affiliate Programme. This means that if you click on one of my links and subsequently make a purchase, I will receive a small commission of store credit, at no extra cost to you.