Thursday, April 29, 2021

Hey friend....!!

Hey friends...

Ashlee here with another card to share with you and this one is a slimline with the super duper cute chickens from the "Chicken scratch" stamp set....

I just love this set, it is SO much fun to use!! 


To create this card I started with a slimline base and masked off the bottom part before stamping on a gingham background using CPD Cranberry fizz ink... 

Once I removed the mask I stamped a sentiment underneath the gingham from the same stamp set chicken scratch!!

I then added a tower of chickens that I coloured using Parkoo shop alcohol markers...

This completed the slimline card, I hope you like it!!


Until my next post, happy crafting my friends...

Hugs Ashlee 

Tuesday, April 27, 2021

Picnic penguin - Have a nice day! - Larissa


Hi everyone, I am Larissa from Car-d-elicious and today I am posting a new card on the blog from Gerda Steiner designs. This time I have made a card with the digital stamp Picnic penguin from Gerda Steiner designs. I have coloured the image with my Polychromos pencils and a black glaze pen and then I have fussy cut the image.


I have die-cut a grass edge from white cardstock with a die from the set Snijmallen Slimline randen 3 Gras & wolken (CDSN-0091) from Carlijn Design. I have coloured the grass with Card deco essential dye ink Olive green. I used the same ink and also Rustic wilderness Distress ink to add paint splatters on the grass. I have made a stencil with a cloud die from the set Snijmallen Slimline randen 3 Gras & wolken (CDSN-0091) from Carlijn Design and made a cloudy background with the Card deco essential dye ink Light blue. I glued the grass on the cloudy background and then I glued this background on a white card. I have used foamtape to glue the image on the card. I have stamped a sentiment from the set Simple script (retired) from Clearly besotted next to the image, I have dry embossed two lines above and belowe the image.


*********************************************************************************
STAMP: Picnic penguin from Gerda Steiner designs, Simple script (retired) from Clearly besotted
COLORING MEDIUM: Polychromos pencils
PAPER: White cs
INK: Rustic wilderness Distress ink, Card deco essential dye ink Olive green and Light blue
DIES: Snijmallen Slimline randen 3 Gras & wolken (CDSN-0091) from Carlijn Design
ACCESSORIES: Black glaze pen

I am a participant in the Gerda Steiner designs Affiliate Programme. This means that if you click on one of my links and subsequently make a purchase, I will receive a small commission of store credit, at no extra cost to you.

Monday, April 26, 2021

All about you....!!

 Hey crafty friends...

It's Ashlee here and today I'm sharing a card using the adorable bear from the "Birthday bear" stamp set!!

I coloured him up using Parkoo shop alcohol markers then fussy cut him before adding it to the card base....


I created a fun colourful background and then added stamped the "Today is all about you" sentiment straight on top....

To finish it all off a touch of pretty pink sequins attached using glue dots!!

Before I go I thought id mention there is two brand new stamp sets available in the GSD store...

I hope you enjoy this party card, hugs Ashlee

Sunday, April 25, 2021

Scene Card - Grow Happiness

Hi everyone! It’s Jeannie (InsideoutJeans) on the blog today with Gerda Steiner Design’s newest stamp set named, Grow Happiness

Since this is a stamp set filled with plants, I thought I would recreate a little corner decorated with a bunch of plants. I pulled up a photo on google and basically drew in the lines to mimic the set up of a corner next to a bit window with shelves for plants. 

Once I set up scene in pencils, I stamped out the images onto the card and then used a copic friendly pen to draw in the lines and stamped all images I wanted to use. I almost used all the images from this set except for one and two of the sentiments. 


If you love plants, this set is definitely a fun one to have, especially if you also love kitties. 

Thanks for stopping by today and I hope you get inspired to create. Come back again soon for more inspiration and ideas! Happy Crafting! 


Friday, April 23, 2021

You're my cup of tea by Noga Shefer

Hi crafty friends,  Noga  here and I am so happy to share with you another project for Gerda Steiner Designs today.


My tag featuring the adorable "Positivi-Tea 4x6 Clear Stamp Set" stamp set and "Positivi-Tea Die Set". This set is so cute!!

For the background, I die cut a scallop tag out of Bristol smooth cardstock. 
I ink blended the background using Distress Oxide in tumbled glass and splashed it with water.

Next I colored the sweet images using copic markers. I glued it to my panel with foam tape for dimension.

Next I stamped a greeting from this stamp set using black ink.

For a final touch, I added some clear hearts sequins.

I hope you enjoy the tag I created and feel inspired to create!

Thanks for stopping by,

Tuesday, April 20, 2021

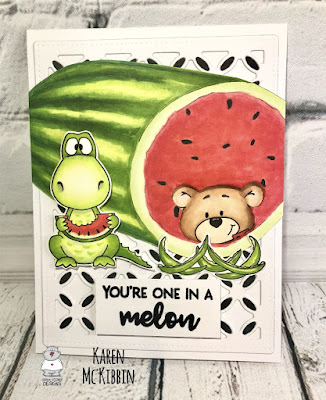
One in a Melon

Hi and happy Wednesday everyone.  It’s Karen here today and I want to share a card made with a brand new stamp set from Gerda Steiner Designs called Melon Friends. This is such a cute stamp set as you can see from the little critters on my card and it will be available in the Gerda Steiner Designs shop tomorrow! 


To make this card, I drew a rough watermelon (just an oval with a round end), and when I had it looking the way I wanted it, I went over my pencil lines with a copic marker. After colouring it in with copic markers, I fussy cut it out right against the coloured line.  I stamped and copic coloured almost all the images in the stamp set and cut them out.

Next, I diecut a lattice background frame from white and black cardstock.  I paper pieced the black pieces into the small oval shapes, gluing them in place. Any cover die would work here or just leave the card as it is - the die is hardly noticeable.  I then glued the lattice frame down to my card base.  I had made a mask of the little bear image, and I placed this where I wanted it to go on the watermelon.  I was hoping it would look like he was inside the watermelon to match the sentiment, but I was also conscious that inside the card, his body would have to be able to fit towards the bottom of the card.   Now here’s the scary part - I fussy cut out the bear image through all the layers of cardstock.  If you have the dies, this would be much easier! I started in the middle of the bear’s head and cut out to the edge. It got a little dicey around the ears, but I was fairly happy in the end.  I went around the cut edge with the same red copic marker I had used for the watermelon to give it a smoother look.  Now, the easier way to have done this, would be to stamp, colour and cut out a second bear head and then just glue that to the front of the card.  But that’s hindsight at work ...! :)

I spread glue across the back of my coloured bear image, held him up to the inside of the card, and once I had his head lined up with the opening in the watermelon, I carefully pressed him down to the inside of the card so he was positioned correctly.  I added the watermelon border just underneath him on the inside.  On the front of the card, I attached the dinosaur with foam tape and glued the rinds just under the bear.  The sentiment is stamped and embossed in black, and popped up on foam tape. 

Thanks so much for stopping by and I hope you’re having a great day!


Frogs clear stamps - Hoera - Larissa


Hi everyone, I am Larissa from Car-d-elicious and today it is my turn again to post a card on the blog from Gerda Steiner designs. I have made a card with the one of the sweet frogs from the set Frogs clear stamps from Gerda Steiner designs. I have stamped the image with Versafine clair nocturne inkt on Aquarelpapier smooth Wit 200g A6 from Vaessen creative and then I embossed the image with clear embossingpowder. I have coloured the image with my Derwent inktense pencils and then I have fussy cut the image. 

On a white card I have made paint splatters with the black Posca pen and then I doodled lines around the edges of the card with a black fineliner. With the Crea-nest-lies XXL 33 from Crealies I have die-cut a circle from orange patterned paper from the Take note paperpad from Doodlebug. I used the Crea-nest-lies XXL 92 from Crealies to cut a larger circle from black cardstock and then I glued the orange circle on top of it and then I glued them both on the card. With the Stitched alphabet die-namics from My favorite things I have die-cut the word Hoera (hurray) three times from black cardstock. I glued all the letters on top of each other and then I glued the word on the circle. I used foamtape to glue the image on the card. I have stamped a sentiment (congrats) from the set Stempels "Grote teksten 4" from Carlijn design under the word hoera. I have cut a couple of stars from black cardstock with the Star confetti die from Alexandra Renke and I added those on the card. 


*********************************************************************************
STAMP: Frogs clear stamps from Gerda Steiner designs, Stempels "Grote teksten 4" from Carlijn design
COLORING MEDIUM: Derwent inktense pencils
PAPER: White and black cs, Take note paperpad from Doodlebug, Aquarelpapier smooth Wit 200g A6 from Vaessen creative
INK: Versafine clair nocturne
DIES: Crea-nest-lies XXL 33 & 92 from Crealies, Stitched alphabet die-namics from My favorite things, Star confetti die from Alexandra Renke
ACCESSORIES: Clear embossingpowder, Black fineliner, Black Posca pen

I am a participant in the Gerda Steiner designs Affiliate Programme. This means that if you click on one of my links and subsequently make a purchase, I will receive a small commission of store credit, at no extra cost to you.

Friday, April 16, 2021

Make a Wish

 
Hello, Margreet here.
I made this card with Make a Wish Mouse Blowing out Birthday Cake Candle for Gerda Steiner Designs.

The base card has a square passepartout.
I embossed the cardstock before using distress inks Fossilized Amber, Picked Raspberry and Peacock Feathers. 
The mouse and cake are colored with copics and fussy cut.
The word Happy is stamped with Versamark and then I put Distress embossing glaze Kitsch Flamingo on it and heatembossed. Unfortunately this turned out black, but hey, that's beautiful too.
With Versamark I stamped BDAY on a leftover of the cardstock and heatembossed again with Distress embossing glaze Kitsch Flamingo. 
I rounded the corners of the card and the leftover and inked the edges with Picked Raspberry.
I used some sequins to finish the card.
I hope you like it. It was fun making this card.
xxx Margreet


Tuesday, April 13, 2021

Frogs (Clear stamps) - Hugs tag - Larissa


Hi everyone, I am Larissa from Car-d-elicious and today I am posting a new project on the blog from Gerda Steiner designs. This time I am showing a tag that I have made.

On the tag I have used one of the frogs from the set Frogs clear stamps from Gerda Steiner designs. I have stamped the image with Versafine clair nocturne ink on Aquarelpapier smooth Wit 200g A6 from Vaessen creative and then I embossed the image with clear embossingpowder. I have coloured the image with my Distress inks and then I have fussy cut the image. 

The tag is cut from dark brown cardstock with the dies from the set Big labelzz & tagzz Rough edges (CLBigLT19) from Crealies. I have cut the layer on top of it from flower patterned paper from the Bundle of joy paperpad from Echo park. I used the die set to cut a little rectangle strip from the dark brown cardstock and glued it on the tag together with the frog. I have glued a little pink enamel heart on. With the Simply said hugs die (retired) from Avery elle I have cut the word Hugs three times from the darkbrown cardstock. I glued them on top of each other and the I glued the word on the tag. 


*********************************************************************************
STAMP: Frogs clear stamps from Gerda Steiner designs
COLORING MEDIUM: Distress inks
PAPER: Aquarelpapier smooth Wit 200g A6 from Vaessen creative, Dark brown cardstock, Bundle of joy paperpad from Echo park
INK: Versafine clair nocturne
DIES: Big labelzz & tagzz Rough edges (CLBigLT19) from Crealies, Simply said hugs die (retired) from Avery elle
ACCESSORIES: Clear embossingpowder, White embroidery thread, Pink enamel heart

I am a participant in the Gerda Steiner designs Affiliate Programme. This means that if you click on one of my links and subsequently make a purchase, I will receive a small commission of store credit, at no extra cost to you.

Sunday, April 11, 2021

Is Summer Here Yet?

Hi everyone! It’s Jeannie (InsideoutJeans) on the blog today with Gerda Steiner Design’s stamp set named, Pool Piggies. Yes, I know it's a summery set but I'm just looking forward to the lazy days of summer.


I also was inspired by my friend Amanda, who created a fun ocean view and I wanted to pull out a technique that I've used before to create the ocean. She used copic markers but I'm using distress inks here because they are just cheaper to use. I inked up a card panel using various brown and blue distress inks. Since they are water reactive, I took a water brush pen and created wavy lines and it picked up the ink color, moving it around a bit. 


Then, I took a white pen from Pear Blossom Press' Essential Gel Pens and added white lines to the ocean to emphasize waves. To bring it up a notch, I also pulled out some white gouache and added them to the white lines. 


I just love how it looks and creates an almost realistic look to the beach! 


Thanks for stopping by today and I hope you get inspired to create. Come back again soon for more inspiration and ideas! Happy Crafting! 


Friday, April 9, 2021

Mom, you are turtley awesome by Noga Shefer


Hi crafty friends,  Noga  here and I am so happy to share with you another project for Gerda Steiner Designs today.


To make this card I took a piece of Bristol smooth cardstock and cut a slimline card- 8.5X3.5 inches.

The background was created by blending old paper distress oxide ink,I spired some water onto it and soaked it up with paper towel.

Next I colored the sweet images using copic markers. I glued it to my panel with foam tape for dimension.

I die cut  the word "Mom" 3 times using Mom script die to make this card a Mother's Day card.

Next I stamped a greeting from the stamp set using black ink.

To finish off, I added a white scallop frame.


I hope you enjoy the card I created and feel inspired to create!

Thanks for stopping by,


Tuesday, April 6, 2021

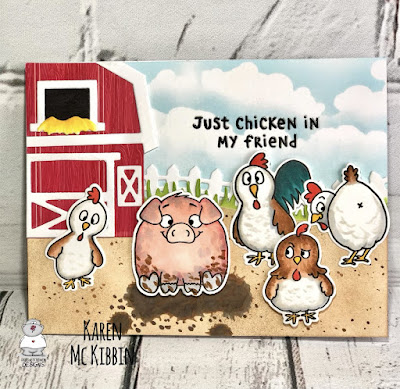
Chicken Scratch Friendship Card

Hello and welcome! It’s Karen here today and I have a friendship card to share with you. I think we are all in need of more personal connections these days and sometimes a hand made card can bring a lot of joy to those we love.  I’ve used the Chicken Scratch stamp set from Gerda Steiner Designs for this one because those chickens have definitely got some attitude! 


I used copic markers to colour in my images.  I added some greys and browns to the pig to make it look like he was playing in the mud.  The copic markers I used are listed down below.

For the background, I masked off the sky and ink blended the ground with a mix of Distress Ink in Tea Dye and Vintage Photo.  I used a copic marker to add brown spots in a random pattern, and also to make a mud puddle for the pig to play in.  Then I masked off the ground before ink blending the sky.  I used the Cloud Edger stencil from A Colorful Life and Clear Day ink from Cosmic Shimmer for the sky.  The fence and grassy borders were cut from Lawn Fawn dies.  The barn was embossed with the Honey Bee Barnwood Planks dies before ink blending it and assembling it. 

Before adding the animals to the scene, I stamped and clear heat embossed the sentiment which is from the Chicken Scratch stamp set and is just perfect for a friendship card, especially these days.   I think those little animals would lift anyone’s spirits! Thanks for stopping by and I hope you’re having a great day! 


Copic Markers:

Chickens - R24, Y17, E23, E35, E13, E11, C2, E40

Rooster - BG78, BG18, BG49, R24, Y17, E35, E13, E11, E40

Pig - R22, R20, R43, N4, N2, E35


Monday, April 5, 2021

Happy Birthday Bunny

Hi there,

it's Tanja here and I created this Birthday card using the adorable Gerda Steiner Designs Birthday Bear stamp set:

  • stamp the bunny and the presents from the Gerda Steiner Designs Birthday Bear set with Lawn Fawn Jet Black
  • color the images with Spectrum Noir Triblend Markers and add extra shading with Faber-Castell Polychromos pencils
  • cut out a heart from patterned paper from the My Favorite Things Woodgrain Whimsy 6x6 paper pack
  • add splatters with watered-down Distress Ink Mustard Seed to a stitched rectangular panel
  • stamp the sentiment from that same set with Distress Oxide Ink Mustard Seed


I hope you got inspired.

Hugs,