Friday, May 31, 2019

Loved....!!

Hey everyone....

It's Ashlee here today to share with you a new Gerda Steiner card and this one uses the
 super cute set "Valentine penguins"...

This set can be used for other themes too not just valentines but this card is a 
little lovey dovey hehe....


I created a simple background for this one to make the cute little penguin the star of the show... 

Penguin is coloured up with Copics and then mounted on the card with some foam tape for dimension. I Finished off the card with a sentiment from the same stamp set and a touch of sequins. 

I hope you enjoy this new card, I will be back again next month with some more inspiration for you!!

Hugz Ashlee. 


Just A Little Card To Say: All Cats ( And Teachers) Are The Best!

Hi Everyone, it's Jessica here and I've had such a blast guest designing this month! Today I have a second card to share, with June just around the corner I thought I'd get started on teacher cards!
I started by creating the card front and die cut an A2 sized rectangle with Bristol Smooth Card Stock. I then blended Distress Oxide Inks in Cracked Pistachio and Squeezed Lemonade using a number-themed stencil. 


Next, I stamped the main image from All Cats and colored in using Spectrum Noir TriBlend Markers. To finish off the card I added a "teacher" word die and coordinating sequins.

Thanks so much for stopping by!

Jessica 

Catch a Wave!

Hi everyone! It’s Jeannie (InsideoutJeans) on the blog today with Gerda Steiner Designs’ new release with the amazing stamp set named, Catch a wave. This will be releasing on June 3!
As with all of the smaller stamp sets in her store, I find them the most versatile because they always have enough images and sentiments to create a great scene. This is no different.

This set is super cute and seemed like a perfect set for no-line coloring. I stamped out all the sets using Fadeout ink and used colored pencils. I wanted to create three different pictures and used each image from the set. Once I finished coloring, I trimmed the photos in squares and matted them twice on blue and white cardstock.


I decided to use a blue card base and used a stencil to add waves to the background. I added the three little images to the card panel and stamped out both sentiments.


I love anytime I can utilize an entire stamp set for a card and this is definitely perfect for it.

Thanks for stopping by! Come back again soon for some more inspiration and ideas!


Thursday, May 30, 2019

Chicken Scratch by Noga Shefer


Hi crafty friends,  Noga here and I am so happy to share with you another project for Gerda Steiner Designs today.


My card featuring  Chicken Scratch Clear Stamp Set and Chicken Scratch Dies.I would like to make a fun card with those adorable critters.


To make this card I took an A2 panel of Bristol smooth cardstock. The background sky was created with clouds stencil and tumbled glass distress oxide ink.


Next I colored the images using copic markers. 
I glued them to my panel with foam tape for dimension. 


Next I stamped a greeting from the stamp set using black ink and added a white stitched frame.

To finish off , I added some sequins for decoration. 

I hope you enjoy the project I created and feel inspired to create!

Have a wonderful day! Noga


Wednesday, May 29, 2019

All I want to do, is have tea with you - Larissa


Hi everyone, I am Larissa from Car-d-elicious and today I am posting a new card on the blog from Gerda Steiner designs.


This time I made a card with the digital stamp Tea-riffic mouse from Gerda Steiner designs. I have coloured the image with my Polychromos pencils, the black glaze pen and a white gelpen. Then I have fussy cut the image. With the Silhouette cameo I have cut a teapot from the file 3D Teapot card from Studio Illustrado 271562 from white cardstock. I coloured the edges of the teapot with Hickory smoke distress ink. Then I stamped with black ink a little flower from the set Chirpy, chirp chirp from Lawn fawn on the teapot. With the Crea-nest-lies XXL 42 from Crealies I have die-cut a square from red design paper from the Celebrations Pretty paper bloc from Marianne design and I glued it on a white card. Then I glued the teapot and the image with foamtape on the card. I have die-cut the sentiment with the Alphabet soup die from Memory box from black cardstock and I glued those above and below the image. Then I decorated the card with a couple of white pearls.


*********************************************************************************
STAMP: Tea-riffic mouse from Gerda Steiner designs, Chirpy, chirp chirp from Lawn fawn
SILHOUETTE CUTTING FILE: 3D Teapot card from Studio Illustrado 271562
COLORING MEDIUM: Polychromos pencils
PAPER: White and black cs, Celebrations Pretty paper bloc from Marianne design 
INK: Versafinie onyx black, Hickory smoke distress ink
DIES: Crea-nest-lies XXL 42 from Crealies, Alphabet soup from Memory box
ACCESSORIES: Black glaze pen, White gelpen, white pearls

Tuesday, May 28, 2019

Herzlichen Glückwunsch - Happy Birthday

Hi there,

it's Tanja here Gerda Steiner has released the fabulous new Frogs stamp set with EnglishSpanish and German  sentiments and over the next three weeks I will show you my creations with the Gerda Steiner Designs German Froesche set. This joyful birthday card is my second creation:

  • create a - as I call it - controlled shaker panel with the help of smooth white cardstock, a frame die, a grass border die, a cloud border die, invisible thread, blue seed beads, double-sided foam adhesive and acetate
  • add color with Distress Oxide Ink (Salty Ocean, Lucky Clover) and a Blending Brush
  • color one of the frogs and the crown from the Gerda Steiner Designs Frogs set with Alcohol Markers - add extra shading with Faber-Castell Polychromos Pencils
  • use a white gel pen for highlights in the eyes and freckles on the cheeks
  • add the sentiment strip with a stitching detail on the left


I hope you got inspired.

Hugs,


Monday, May 27, 2019

Hello Party Animals!

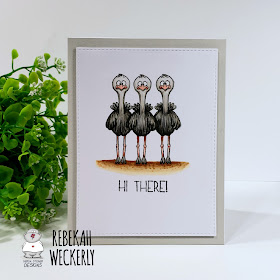
Hello, crafty friends! Its Rebekah with you today sharing a card I made using the first stamp set I ever purchased from Gerda Steiner  - The Party Animals Stamp Set!

I have made several cards using this set but today I only used one of the five different animals in this set.


I think this ostrich is just too funny and  so cute! I wanted to keep the focus in the image for this card so I kept the scene super simple!

On Copic friendly paper with Copic safe ink, I started by stamping the middle ostrich and then created a mask. I placed the mask on that ostrich and then stamped another ostrich on each side.


I wanted them to have a lot of texture to mimic the look of feathers. Its is easy to creat using a flicking motion with the brush end of the markers.

I added a bit of a ground for these little guys  and my card was just about done. I mounted the panel with my colored images on gray cardstock, added the sentiment,  which is from the Frogs stamp set, and called it a day! I am quit happy about the way it turned out!

Thanks for spending a few minutes of your day with me! Now go get crafting!
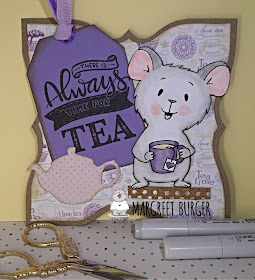
 Today I'm showing you a card with the digital stamp 'Tea'-riffic Mouse by Gerda Steiner Designs.
I found some lovely matching paper in my stash.
The image is printed onto Perfect Colouring Paper and coloured with copics and then fussy cut.
I grounded the sweet mouse on a piece of cork masking tape.
The base card is made with a Shape Art stencil from Dutch Doobadoo. Then matted with DP.
On the label a sentiment from Marianne Design (Karin Joan).
The teapot is a Marianne Designs' Creatables.
Wishing you a nice week.
xxx Margreet


Sunday, May 26, 2019

Umbrella Mouse


Hi Everyone, Melissa here.

For today's inspiration I made a simply card using the 'Umbrella Mouse' Digital Image.

The image has been printed Copic X-Press It Blending Card and coloured with Copic Markers.  The background has also been coloured with Copic Markers.
This image has been cut down to 9.5x12cm.

The base card has been cut from kraft card using the Mama Elephant 'Hexastar' die.
Adhere image to base card.


I hope you have a great day
xxx

Saturday, May 25, 2019

Meowy Birthday Card


Hello friends! It's Karla back today with a sweet kitty birthday card using the adorable Cat In Bookshelf Digital Stamp from Gerda Steiner Designs. This cutie is just relaxing and taking it easy - the purrrfect thing to do on a birthday 😸 I coloured the image in with Copic Markers and added a few white gel pen highlights in various areas. 


I found some fun sentiments in my stash that went with my kitty birthday theme and created a little pocket and pull-out tag. These pretty papers are from the Vicki Boutin line, and I added some flower sequins and tiny stickers to embellish.


Inside, I stamped a birthday sentiment on the cut out from the pocket that was created on the front of the card and added a little washi sticker to finish it off. Now this card is ready to send to a meowy special person!


Thanks so much for stopping by today! Be sure to head over to the Gerda Steiner Designs Shop to see what inspires you to get creating, and have an awesome weekend!

Hugs,
Karla

Video Tutorial: Love You Sew Much Bunny

Happy Saturday everyone!  Allison Cope here today.  I hope you’re having a wonderful holiday weekend.

Today I’m going to be watercoloring with digital stamps.  I chose to use the adorable “Love You Sew Much Bunny” digital image with some Distress Inks by Ranger.

Come and join me today at my desk for this fun tutorial…
https://www.youtube.com/watch?v=lFPzMW9gKMI&feature=youtu.be

Here is a look at our little bunny again on his stitched rainbow back ground…


Here’s a little close up of our critter once again…


To check out more fun digital stamps by Gerda, click HERE.

Thanks for joining me again today.  I’m also wondering if there is something you would like to learn or know more about using digital stamps on your creations?  Do you have a question you wish to be answered?  Leave a comment in the post below!

See you all again soon!  Happy crafting!

~ Ally ~

Friday, May 24, 2019

SMOOCH!


Happy Friday everyone! Cathy here sharing a card today using the new Frogs stamp set again with what I think is the most adorable frog stamp I've ever seen!

I really love that this set included a little crown and the "smooch!" sentiment. It's so cute!


I created a little pond scene by stamping the frog on the lily pad several times and using just small portions of the lily pad around the outside. (I've Copic colored all of the images and fussy cut them out). 

For the main image, I stamped the crown first and masked it followed by the frog on the lily pad. To get the lily pad behind the frog, I masked the whole image and stamped the lily pad again upside down.

I've inked the background with Evergreen Bough and Broken China Distress inks and for the big lilies, I had to get creative since I don't own a large lily stamp or die. I used a palm tree die in my stash and layered up the fronds. After I colored them up with Copics, I think they pass for flowers pretty nicely. I really love that pop of bright color and he looks happy about it too!

Hope you have a great weekend and see you again soon!

Wednesday, May 22, 2019

Go Wild!


Hey there, friends!


It’s Kelly Martin here, and I’m so honored to be a guest here on the Gerda Steiner blog today. I’m so grateful for their kind invitation and I had so much fun creating with these adorable “Go Wild” critter stamps!


These cards were pretty easy to pull together--and they are all one-layer! So let’s get right down to it, shall we?
I started out by cutting and scoring two 4.25 x 5.5 inch card bases and then got to work on creating the scenes.


For one layer cards, it’s all about masking. It helps to do a little bit of pre-planning, but it doesn’t have to take long! Just stamp out your images on to a piece of scratch paper and that will help you figure out what order you need to stamp your images and apply your masks on the real card.


And you know what I love about these stamps? They’re really easy to create masks for. Just stamp out the images on to some masking material (I used these full adhesive post-it notes) and then stamp your front image first, then apply your masks and stamp the rest of your images (following your scratch paper plan) accordingly!


I colored these critter images from the Go Wild stamp set with copic markers and then stamped the sentiments (again using some masking with painter’s tape!) to finish off the card.

Thanks so much for stopping by the blog today, and be sure to check back in a few weeks for some more cards that are just ducky!!

Hugs,
Kelly

Pink teapot with Tea-riffic mouse - Larissa


Hi everyone, I am Larissa from Car-d-elicious and today I am posting a new project on the blog from Gerda Steiner designs.


This time I made something with the new digital stamp Tea-riffic mouse from Gerda Steiner designs. I printed the image twice, the first time normal and the second image is horizontally mirrored. I have coloured both the images with my Polychromos pencils, the black glaze pen and the white gelpen. Then I have fussy cut both the images.


With the Silhouette cameo I have cut a little teapot from pink cardstock. I used the file 3D Teapot from Lori Whitlock 49612. From white cardstock I have die-cut a grass border with the Cloud and grass die from CC designs and I coloured it with Mowed lawn Distress ink. I glued the grass borders on the side of the teapot and then I added the images with foamtape. 


I have die-cut a couple of tiny flowers from white cardstock with the Flower 2 dies from Paper smooches and I glued those on the grass. I die-cut a couple of more flowers and also some leaves that I coloured with Mowed lawn Distress ink. I glued those flowers and leaves on the lid of the teapot. 


I have decorated all the flowers with white mini pearls.


Inside this teapot I could put 12 bags of tea


*********************************************************************************
STAMP: Tea-riffic mouse from Gerda Steiner designs
SILHOUETTE CUTTING FILE: 3D Teapot from Lori Whitlock 49612
COLORING MEDIUM: Polychromos pencils
PAPER: Pink and green cardstock
INK: Mowed lawn Distress ink
DIES: Flower 2 dies from Paper smooches, Cloud and grass die from CC designs
ACCESSORIES: Black glaze pen, White gelpen, White mini pearls


Tuesday, May 21, 2019

Küsschen - Kisses

Hi there,

it's Tanja here and Gerda Steiner has released the fabulous new Frogs stamp set with English, Spanish and German sentiments and over the next three weeks I will show you my creations with the Gerda Steiner Designs German Froesche set. This little frog prince is my first creation:

  • color one of the frogs and the crown from the Gerda Steiner Designs Frogs set with Alcohol Markers - add extra shading with Faber-Castell Polychromos Pencils
  • use a white gel pen for highlights in the eyes and freckles on the cheeks
  • add Nuvo Aqua Shimmer Midas Touch for extra shimmer on the crown
  • color the sentiment strip with Distress Oxide Ink Lucky Clover
  • create a background on a stitched rectangular panel of smooth white cardstock using Distress Oxide Ink Salty Ocean, the Create a Smile Focal Point stencil and a Blending Brush
  • as final embellishment adhere three little Droplets Pool Hearts from Little Things from Lucy's Cards


Have a wonderful day.

Hugs,


Monday, May 20, 2019

He's a Prince!

Hi, there! Its Rebekah with you this evening with a another fun card using the Gerda Steiner Designs Frogs Stamp Set!


This would be a great card to give to a friend who is newly engaged...as a bit of a joke! 

This card came together super fast. All I did was lay out this simple scene in my MISTI. I was sure to use Copic safe ink because I knew I was going to be using my Copic markers. It's my favorite medium! I did stamp and fussy cut the crown. I just attached it to my finished image with a little liquid glue. Using liquid glue gave me a little time to get it positioned perfectly. 


I lined up my sentiment along the edge of the lily pad and stamped it in blue ink to mimic the color of water. Since this is a longer sentiment, it was very easy to bend the stamp to the shape I needed it to be.

 Once I was finished coloring, I used a rectangle die and cut it out. I then attached it to a blue card base. And DONE!

Thanks for checking out the blog today!