Thursday, January 31, 2019

More then Chocolate!

Hi, crafty friends! Its Rebekah here with you this evening bringing you this fun Valentine's Day card using the 'More then Chocolate ' stamp set! How adorable is this little piggie. I can totally identify!


This is pretty close to a one layer card! They can be so hard for me sometimes with this larger image made it easy!

Here is how I made this card -
1. Create a top folding card base. My base is 4 1/4 x 5 1/2. On the front for the base, cover the center with the heart stamp. I created a loose pattern. I used a few different colors of inks starting at the bottom with the darker colors and worked to the top using lighter colored inks. 
2. On a scrap of Copic safe paper I stamped the little piggie and colored him in with copic markers. Then I fussy cut him out and added foam tape behind him for a little dimension.
3. Then I stamped the sentiment on pink cardstock and heat embossed it with white embossing powder.  


Its as easy as that! Super fun, cute and easy to make! 


Wednesday, January 30, 2019

Umbrella mouse - Larissa


Goodmorning, I am Larissa from Car-d-elicious and today I am posting a card with a stamp from Gerda Steiner designs. This time I made a card with the digital stamp Umbrella mouse from Gerda Steiner designs. I have coloured the image with my Polychromos pencils and the black glaze pen. I have fussy cut the image.


On a white card I glued a strip of orange design paper from the Country fair plaid paperpack from My favorite things (retired). On another piece of white cardstock I made a background with the help of the Rainy day stencil from Clearly besotted stamps and Tumbled glass and Broken china Distress oxide ink. I have die-cut a little hill from white cardstock with the Stitched basic edges from My favorite things. I have coloured the hill with Mowed lawn and Lucky clover Distress oxide ink. On the background I have stamped 2 sentiments from the stampset Hootie patootie from Lil inkers. With a black fineliner I doodled some lines on the background. I have glued the background with foamtape on the card and then I glued the image with foamtape on the card. Then I rounded the bottom corners of the card with the corner chomper.


*********************************************************************************
STAMP: Umbrella mouse from Gerda Steiner designs, Hootie patootie from Lil inkers
COLORING MEDIUM: Polychromos pencils, Distress oxide inks
PAPER: White cs, Country fair plaid paperpack from My favorite things (Retired)
INK: Versafine onyx black, Tumbled glass, Broken china, Mowed lawn and Lucky clover Distress oxide ink
DIES: Stitched basic edges from My favorite things
ACCESSORIES: Black glaze pen, Corner chomper, Rainy day stencil from Clearly besotted stamps, black pen

Tuesday, January 29, 2019

Miss you Puppy

Hi there,

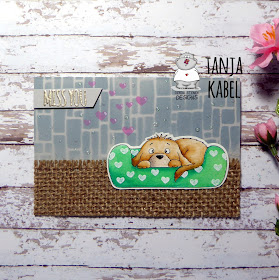
it's Tanja here and today I created this cute little card using the Gerda Steiner Designs Miss you Puppy Digital Stamp:

  • color the Gerda Steiner Designs Miss you Puppy with ZIG Clean Color Real Brush Pens and a damp watercolor brush
  • stamp some hearts from the WPlus9 Little Bits set with Versamark onto the dog bed and heat-emboss them with WOW! Bright White Super Fine embossing powder
  • add a strip of burlap as a carpet
  • and apply Distress Oxide Ink Weathered Wood through the Tim Holtz Slate Layering Stencil 
  • stamp some more little hearts with Altenew Crisp Ink Puffy Heart and add a white highlight with a glass dip pen
  • stamp the sentiment from the Gerda Steiner Designs Blast Off set with Versamark onto a strip of grey cardstock and heat-emboss it with platinum embossing powder
  • add some Nuvo Glitter Drops White Blizzard as final embellishment


Have a wonderful day.

Hugs,


Umbrella mouse

 Hi, Margreet here.
I created a card with the sweet new digital stamp Umbrella Mouse from Gerda Steiner Designs
I started with distressing the design paper.
Then adhered it to a white cardstock card.
Printed and colored the cute image, and cut it out with a Crealies stitched circle die. 
The sentiment is computer generated and after printing I cut it out with a cloud die and mat it on a blue cardstock die cut.
The raindrops are made with a part of Creatables LR0572 from Marianne Designs.
Hope you like my card with this little mousey.
xxx Margreet


Monday, January 28, 2019

Friendship card with Kaja

Hi there,
It's Kaja from Kajcyika crafts with you today with a cute friendship card!

Take a look:
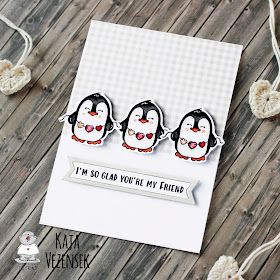
I decided to go with a simple design that has a valentine's day feel to it. I think it's important to remember letting our loved ones know how do we feel about them and that's the reason I made this friendship card.

First, I stamped out the penguins from the Valentine penguins stamp set and colored them in using alcohol markers. I used pinks for the hearts and the black for their bodies.
Then, I cut down a piece of gray patterned paper that I put on the top half of my card. I placed the three penguins on the edge of it.

The last thing I added was a sentiment that reads 'I'm so glad you're my friend' which I put on a die cut banner.

This finished of the card. Thank you so much for joining me!

Kaja

Sunday, January 27, 2019

Panda in Love

Hi Everyone,  Melissa here.


For today's card I have used the 'Panda in Love' digital stamp.

The image has been printed onto Copic X-Press It blending card and coloured with Copic Markers.  I have trimmed this card to 14 x 10cm.   This is the base card.
I have hand drawn a border around this base card using a Copic Mulitliner Pen.

Cut the die sentiment twice and adhere on top of each other and adhere them to the base card.

Colour some of the hearts with a glitter pen then apply Glossy Accents to those hearts.
Let dry.


I hope you have a great day
xxx

Miss You Puppy Card by Karla


Hello friends! Karla back today with a cute Missing You card using the adorable new digital image 'Miss You Puppy' from the Gerda Steiner Designs shop. This little cutie could work equally well for a thank you, love you or pup-tastic birthday card, but I chose a miss you brush lettering sentiment stamp from my stash to add on top of the Pinkfresh Indigo Hills patterned paper, embossed with Emerald Creek Magical Mysteries Embossing Powder in Dragon's Egg. The subtle striped heart is diecut with a MFT die, which I used inside a stitched circle and layered over a pretty white doily.


It was easy to give this little guy a pretty patterned bed by simply printing out an extra digi stamp on another piece of white copy paper and then gluing the purple patterned paper directly on top of the image. I then ran the whole page through the printer again and fussy cut out around the bed before gluing it down to the image printed on cardstock. I coloured this guy in with Copics and Prismacolor Markers and shaded the patterned paper to give a bit of depth. A white gel pen adds some highlights, and I added some Paige Evans stickers and Maya Road twine for embellishments.


Inside, I stamped a heartfelt sentiment on my kraft cardstock base with Distress Oxide Inks. I just love how they show up on darker cardstocks!


Thanks so much for stopping by today! I hope you have a fantastic weekend and a wonderful week ahead 💜 Be sure to head over to the Gerda Steiner Designs Shop to see what inspires you to create today!

Hugs,
Karla


Saturday, January 26, 2019

One Layer Valentine's Day Card - Lovely Pandas

Happy Saturday! It's Rebekah here, bringing you a one layer, easy Valentine's Day Card! I was so excited to see this week that the Lovely Pandas stamp set was back in stock at the Gerda Steiner store! It's easy to see why this set has been so popular. These images are simply adorable and so fun to color!


This is a one layer, quick and easy Valentine's Day card that would be perfect to give to your significant other, a child or even a friend. There is a little masking involved but really the process is simple! 

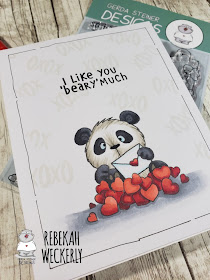
Step 1. On a 4 1/4 x 5 1/2 folded card base, stamp the hearts image towards the bottom of the card. Stamp the hearts again on masking paper and fussy cut.

Step 2. Place the hearts mask over the hearts on the card base then stamp the panda. Remove the mask and color the images with your whichever color medium you would like! I used Copic markers.

Step 3. Mask off 1/4 inch around the edge of the card then using a light gray ink, stamp the 'XOXO' sentiment randomly. Get close to but don't stamp over your panda! Stamps sentiment in black ink.

Step 4. Use a fine a fine tip marker to draw a loose frame around the edge of the card. I did not try to get this straight at all. The fact that the line is not perfect adds to the whimsical feel of the images! 


One of the best things about this card is that is is flat - perfect for mailing! 

Be sure to visit the Gerda Steiner shop and get this set before its gone...AGAIN!
Click here to go directly to the site - Lovely Pandas


Two peas in a pod valentine

Hello friends! Happy Saturday!

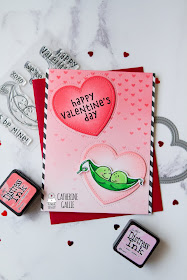
Today I'm sharing a Valentine's Day card I made using the gorgeous new stamp set called Peas be Mine.


To start off, I stamped and coloured the adorable peas in their pod image using copic markers. I then cut it out using my scan n cut and set it aside to create the rest of the card.

Using distress inks I ink blended the background to achieve a gradient look. I then decided to apply a small falling hearts stencil and ink blend some more to add the tiny hearts on the background.

Next, I die cut the 2 stitched hearts from this background and set those hearts aside and cut some more hearts out of white cardstock and ink blended those hearts separately. I stamped the sentiment onto the darker heart and heat embossed it using clear embossing powder over the top.  I die cut the hearts three more times using white card stock and glued and stacked the heart pieces together for dimension.


I stamped a piece of A2 white card using a diagonal stripe background stamp so that I could have a small strip down each side. I trimmed the pink ombre panel so that it was slightly smaller than the diagonal panel.
Now it was time to assemble the card. First I adhered the diagonal stripe piece to the card base and then adhered the pink panel on top of that and inlaid the stacked hearts into the die cut pieces. I adhered the pea image to the bottom heart using foam tape for even more dimension.


I stamped the sentiment inside the card and added a stamped image of the peas in the pod and some hearts.

This completes the card for today, I hope you like it. I will be back next week with another cute pea card.

Enjoy your weekend!
Catherine x


Friday, January 25, 2019

On The Table

Happy New Year everyone! I can't believe it's already 2019 and it's exciting because new stamp sets are going to be released. One of the newer ones from Gerda Steiner is this one I'm using today, On The Table.  


As always, it's an ADORABLE set. I love peeking animals and Gerda does them so well. This one is no exception. I created a scene for this stamp set where the doggie and kitty are peering on the table because there are some milk and cookies. I added a window for interest and used a stencil for the wall so the background wasn't just one color. Additionally, I added interest to the table by drawing in woodgrain. Otherwise, I think the table and the background would be a bit boring. 

Isn't it just adorable?! 

I love how this card turned out and I think the stamp images in this set are perfect for creating a cute scene.

Thanks for stopping by to take a peek and hope it inspires you to create your own scene using these stamps.

Thursday, January 24, 2019

A sweet lollipop

Hi there!
Francesca from Unarcobalenodicolori here.
I'd like to show you my second make as GD for Gerda Steiner Designs.


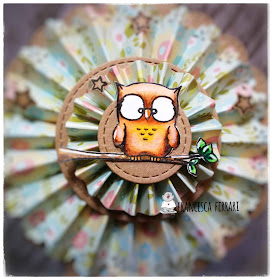
I created a lollipop card featuring the super cute owl from the "FOXES" clear stamp set.


The owl is the main character of my card... I immediately fell in love with it!


I colored the stamp with Zig clean color real brush and colored pencils. The details were made with white gel pen.

I embellished my card with the stars of the stamp set, little banners and enamel dots.


Thank you so much for your attention!
Hope you have a nice day!

Hugs
Francesca


Wednesday, January 23, 2019

Penguin with heart - Larissa


Hi everyone, I am Larissa from Car-d-elicious and today I am posting a new card on the blog from Gerda Steiner designs.


This time I have made a card with the digital stamp Penguin with heart from Gerda Steiner designs. I have coloured the image with my Polychromos pencils and then I have fussy cut the image. I have stamped the stripes from the set Cozy plaid stamps from Lil inkers with Tulip red ink from Versafine clair. I have stamped a sentiment from the set XOXO sentiments from CC designs with Nocturne ink from Versafine clair. From black cardstock I have die-cut a couple of hearts with the Confetti creative cuts from Mama elephant and I decorated my card with those.


*********************************************************************************
STAMP: Penguin with heart from Gerda Steiner designs, XOXO sentiments from CC designs, Cozy plaid stamps from Lil inkers 
COLORING MEDIUM: Polychromos pencils
PAPER: White and black cs
INK: Versafine clair Nocturne and Tulip red


DIES: Confetti creative cuts from Mama elephant

Monday, January 21, 2019

Hello astronaut...!!

Hey everyone....

It's Ashlee here today with a new card to share with you!!

For this card I have used the cool set "Blast off"....
This set is such a fun one to create space themed cards, perfect for male birthdays and greetings!! 


To create this card I used some galaxy designer paper and then cut out some clouds using a cloud border die with white cardstock and vellum. 

I coloured and cut two of the cute little aliens, the awesome little astronaut and the flag then added them onto the card base with some foam tape for added dimension. 

A touch of pretty sequins to add some bling finished off the card. 

I hope you like my latest Gerda card inspiration, 
Happy crafting, Ashlee

Sunday, January 20, 2019

Hello! Its Rebekah with you this evening bring you a card made with the Hello Little One stamp set.


 For this card, first I stamped and colored the image with Copic markers. I also added shadows and highlights with colored pencils. I then fussy cut out the entire image. I used a black Copic marker along the edge  to make it look like the cutting is perfect! (I can assure you, its not!) 


I used a cloud stencil and Distress Inks to create the background. I added my image placing it at a slight angle to make it look like this sweet baby just drifted onto the moon.

I then stamped the sentiments with Versamark ink and embossed it using white embossing powder. I also added a few small hearts for a pop of color and a little more sweetness! 

I love the blue night sky on this card but I think it would look amazing in pink, too! 

Be sure to share with us what you make using Gerda Steiner Designs stamps! We love to see your creations!

Love you sew much Bunny

Hi Everyone, Melissa here.


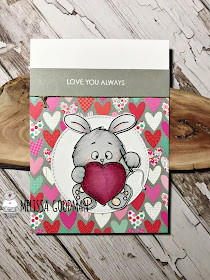
For today's card I have used the 'Love you sew much Bunny' digital stamp.

The image has been printed onto Copic X-Press It blending card, coloured with Copic Markers and fussy cut.  Set aside.

For the base card I have used a piece of 300gm white card measuring 14x10cm.

Cut a piece of heart paper 10x10cm and adhere to base card using double sided tape.
Cut a piece of grey paper 2x10cm, white emboss sentiment and adhere this to the base card, right about the heart paper.
Knot a piece of Twine and adhere to the card.

Cut a stitched white circle from white card and adhere to card using double sided tape.

Adhere Bunny to card using foam tape.  Colour the heart with a Glitter Pen then add glossy accents to the Heart, Eyes and Nose.


I hope you have a great day
xxx

More Than Chocolate? Oh My Goodness!!!

Hello and Happy Sunday Crafty Friends!  Tina here from Cards and Coffee Time. Today I am sharing a card with the New to the Gerda Steiner Shop - More Than Chocolate Stamp set:)  Oh my goodness!!!  You gotta love that adorable chocolate loving piggy!!  I was inspired by the chocolate bar he was holding to create my background.  Creating a candy bar wrapper is super easy using the heart from the stamp set and ready.........foil from our kitchen, yes! Can you believe it, I love the way it turned out and hope you do too:)


Creating a Chocolate bar is super easy too, just use brown cardstock and Walnut Stain Distress Ink:)  You can watch the tutorial on how I created this card down below.  Thanks so much for stopping by!  Wishing you a fabulous and delicious day!  Hugs and Happy Crafting!


Step by Step Tutorial Below


Saturday, January 19, 2019

Peas Be Mine

Hi everyone! It's Jeannie and I'm back to share another card with you today that's perfect for Valentine's Day or any occasion to let someone know you love them. I'm using the new set called Peas Be Mine. It's a small set but it's perfect for a simple card.

I added this sweet image instead a glittery heart so the eye will focus on this portion of the card.


Since the image is super simple, I wanted to create a fun background. I did so by masking off stripes and used three distress inks to create this purple ombre look. I know the conventional colors for Halloween is pink and red, but I decided purple will work perfectly for this as well. 


I just love how this card turned out because the focus of the card ultimately draws the eye to the pop of green from the image. It's so adorable! 


To finish this card off, I trimmed down the striped background by .25" and popped it on a black card base so it peeks out on the side. I added the sentiment "Peas Be Mine" on the left side of the image. I decided to keep it really simple. 

Thanks for stopping by and I hope you enjoyed the card. 

3 Penguins with heart

Hi, Margreet here.
I want to share a Valentine card with the sweet digital stamp Penguin with Heart
I used the ticket die from Studio Light and some lovely papers from Joy!crafts. The hearts are die cut with Nestabilities.
I downloaded the digistamp in Word. Put 3 of the penguins side by side and resized 2 of them to merge. Colouring was done with copics. I worked on the hearts with Stickles.
Hope you like it.
xxx Margreet

Friday, January 18, 2019

2 Peas in a Pod


Happy Friday! Cathy here sharing a card using the new Peas Be Mine stamps. 
Aren't they so sweet?!


I had some fun with watercolor, stenciling and inks to create a happy background for them. I started by die-cutting a piece of watercolor cardstock and taping off 1/4" on all sides. I then did a wash of Daniel Smith Quinacridone Gold starting from the top and watering down the color towards the bottom to create a nice gradient.


I used a Hero Arts stencil and distress inks in Wild Honey, Fossilized Amber, Crushed Olive and Twisted Citron.

I colored the peas with Copics and fussy cut around them leaving that thin white border to help them stand out on the background.


I die-cut a banner and inked it with Wild Honey and Rusty Hinge distress inks and stamped the sentiment from this set. The patterned paper is from my stash. I love it when I find a random paper that just works.

This stamp set also comes with a Valentine's sentiment, but it's perfect for everyday love cards too.

Hope you enjoyed and see you again soon!