Friday, November 30, 2018

The Mouse is Calling

Hi there!  It's Marilyn here today and I am pleased as punch to be invited as a guest designer for Gerda Steiner Designs and to share my card with you.  These images are just the cutest and fun to create with.
For today's card, I've used the cute Mouse with Phone digi stamp.  Now, I'm not so fond of mice but this little guy is very cute and I like how versatile the image and sentiment are.  It's perfect for dropping a quick note to a friend and I plan to print this very image onto the front of an envelope and make it a set.
The image was coloured with Copic markers using the 'dotty' technique and the following colours:  Mouse T7, T5, T3, T1, T0, R20; Can C7, C5, C3, V28.
Thanks for stopping by and have a great week!

Thursday, November 29, 2018

Two Kittens In A Stocking Card with Karla


Hey friends! Karla back today with a look at the adorable digital stamp Two Kittens In The Stocking in the Gerda Steiner Designs Shop! These two cuties are definitely ready to make someone smile while waiting for Santa to arrive. I started off by printing the stamp on white cardstock and coloured it in with Copics and Prismacolor Markers, both alcohol based. I love adding details on my images after I've finished the colouring, so I grabbed some Silver, Gold and White gel pens and added some dots and dashes and then used some clear Stickles to add sparkly white polkadots on the furry Christmas Stocking cuff.


I created a quilted effect with a background die, using papers from an older Echo Park Christmas paper pad and then added a diecut string of lights across the top for the cute stocking to hang on with a bit of red ribbon.


Some Glossy Accents and iridescent glitter adds more sparkle to the bulbs and a little Merry Christmas sticker with a couple of half pearls finish it off! 


Thanks so much for stopping by today! Be sure to head over to the Gerda Steiner Designs Shop to check out this adorable Two Kittens In The Stocking stamp and see what fun you can have!

Have an awesome week friends,
Hugs, Karla

Wednesday, November 28, 2018

Fa-la-la-Llama Coloring with Polychromos Pencils

Howdy all!  Allison Cope here! Happy Wednesday.

Come and join me for a video tutorial on how to color our adorable “Fa-la-la-Llamas” digital stamp set using Polychromos Pencils on Kraft cardstock.

Grab a cup of something warm and meet me at my desk…
https://www.youtube.com/watch?v=cGq6KRXPtr8

And here’s a quick peek at the card again…

I hope you too get a chance to try out some kraft paper and colored pencils for your next card creation!

~ Allison Cope ~

Tuesday, November 27, 2018

Thank you Fox

Hi there,

it's Tanja here and this week I would like to show you this cute little tag that I created using the new Gerda Steiner Designs Foxes set:

  • color one of the foxes from the Gerda Steiner Designs Foxes set with Faber-Castell Albrecht Dürer pencils and a damp watercolor brush
  • add highlights with a white gel pen
  • cut out one of the CUTplorations Stitched Tags from kraft cardstock and create a background using some of the small images from the Gerda Steiner Designs Happy Fall set and Versafine Vintage Sepia
  • thread dark brown and orange twine through the hole of the tag


Have a wonderful day.

Hugs,


Monday, November 26, 2018

New! Baby Boy and Baby Girl Christmas


Hello Crafty Friends!  I hope your Thanksgiving Holiday was wonderful!! Tina here from Cards and Coffee Time.   Today I created 2 cards from the new Baby Boy Christmas and Baby Girl Christmas stamp sets.  I used my copic markers to color in these sweet images and love how they turned out!


Baby Boy Christmas Stamp Set

Baby Girl Christmas Stamp Set

These are just the sweetest babies and the peeking teddy...well I think it's a perfect present:)  You can watch how I created these 2 cards down below:)  I hope your week is off to a great start and thanks so much for stopping by!  Hugs, Tina


Have a Howly-Jowly Christmas!

Hi Everyone! Cathy here with a card using the adorable new Carol Puppies stamp set. This little guy is my favorite as he reminds me of my little French Bulldog.


For the background, I double embossed a piece of gray cardstock using Versamark ink on a Cuttlebug embossing folder and then heat embossing with Wow! Iced Silver embossing powder.

I cleared off a small area of embossing powder with a paintbrush before heat embossing to stamp the sentiment from this set directly on the cardstock.

It's got a sparkly look to it that you can see a bit better in the photo below.


I colored the puppy with Copics and fussy cut around him, but you could also use the coordinating dies to this set.

The Christmas sentiment is a Pretty Pink Posh die that I've cut 3 times and layered together.

Hope you enjoyed and see you again soon!

Cathy

Sunday, November 25, 2018

Who doesn't love a cute cat - Guest Designer Pip

Welcome back everyone...it's Pip again.  I have two more cards as Guest Designer showcasing the On the Bookshelf stamp set.

First Card


The first step was to stamp the top shelf directly onto the card base and I did a little bit of masking to add the mouse.  I stamped a number of the other images with copic friendly ink and coloured them with alcohol markers.  I didn't do any shading on the spines of the books but used the various shades of the colour range to give some interest.    I then fussy cut the books up to the stamp line as I didn't want the white border for the books.  The second and third shelf of books were adhered with foam tape to add dimension.  I made sure I added the books at random angles to give a bit of movement to the scene.


I added glossy accents to the cat's glasses and Wink of Stella glitter to the globe.

Second Card

As I was designing the first card I had some images coloured that I wasn't going to use so created another simple card with them.


I wanted to show the movement of the pot plant falling so used a couple of shades of ink to stamp the image rotating to the floor. 

Tip: I matched the mat on the card base to one of the colours I had used within the card to make the images pop a bit more.

I hope you have enjoyed these cards.

Handmade by Pip


Saturday, November 24, 2018

Santa cuddles - Catherine

Hello friends,

I'm back to share two cards I've made using both the Santa and a Kitten stamp for the cat lovers and Puppy Kisses for Santa stamp for the dog lovers! I couldn't resist the puppy one when it was released but I love that there is now an option for both! 


I created both cards the same way. Using a light grey piece of card I trimmed 2 pieces to A2 size and die cut a window from both using a window die from my stash. (You can find the die here.) I took a card base and lined up the grey card and used a pencil to mark where the window would be. Next I created the small scene you can see through the window using distress inks and a stencil. I stamped some small trees in green and added snow with a white gel pen. 
(This window view was inspired by Torico.)


To create the window frame I die cut the pieces using white cardstock and then attached a small piece of acetate to the back of the 'window' and the white frame to the front. I then attached the light grey panel to the card base. Dark grey cardstock was attached to the bottom to create the 'carpet' to ground Santa and then I stamped the sentiments using red ink. 

I stamped and coloured the images using Copic markers and used the Brother Scan n Cut to cut them out. 


To finish the cards I attached the stamped and coloured Santa images using foam tape for dimension.

I hope you like my cards for today, these images are some of my favourites. 

Have a lovely weekend!

Catherine x 


Friday, November 23, 2018

Sleepy Cat On the Bookshelf - Guest Designer Pip

Hi everyone, it's Pip here.  I am excited to be a guest designer on the Gerda Steiner Blog showcasing the On the Bookshelf Stamp Set.  I have been having fun creating interactive cards lately and knew exactly what I wanted to do with this stamp set as soon as I saw it.


I started by stamping the images in copic friendly ink and coloured them with simple copic colouring.  I am super happy with how the kitty turned out (see image below for the reveal).  I ink blended the background in light blue distress oxide ink and then applied it heavier over a dotty stencil.  The sentiment is stamped in the same blue ink and I handwrote the 'and'.  

The next step was to create the slider portion of the card.  I adhered the front books and pot plant to the bookshelf so the other books could slide in behind.  The sleepy cat was adhered directly to the card.  The image below shows the reveal of the cat when the you pull the tab...ta dah!


The final touches were adding some glossy accents to the heart and a few nuvo drops to the books.  I hope you enjoyed the card and hope to see you back here soon.

Pip


Carol Puppies

Hi there! In conjunction with the Carol Kitten set, Gerda Steiner Designs released a Carol Puppies set. This is a super cute set for any dog lovers out there. I just had to use them to create a scene card.

First, I decided I wanted to use 3 of the images so I used the three front facing puppies. I masked them so one was in front and two behind. I then added a few snow banks and shaded them using Shaded Lilac distress ink. For the background, I wanted a nighttime scene so I used darker blue shades.


I also decided to use the clefs and did some generational stamping to fill up the night sky. I love how they fade away into the sky.

For the finishing touch, I wanted to add it to be a snowy night. I added splatters of white acrylic paint everywhere. It was kinda hard for me to add that acrylic paint on colored images but I really like how it turned out.


Hope you guys enjoyed it and check out the new sets Gerda Steiner has been coming out with. They all have been amazing.

Thursday, November 22, 2018

Pumpkin Thanks

Hello everyone!  Allison Cope here!  Happy Thanksgiving to all of my US friends out there today!  I hope you’re having a great day celebrating with family and friends today.

Since today and everyday we give thanks, I thought I would start off with an Autumn related thank you card.  I decided to use both “Girl Holding Pumpkin” and “Hedgehog with Pumpkin” digital stamps as my focal point of my card.

Grab a cup of your favorite beverage and join me at my desk as I color and create…
https://www.youtube.com/watch?v=fDuBVqZdEqs

And here is my Autumn inspired thanks creation…


Thanks for joining me today!  I’d love to hear what you would like to learn in future posts using digital stamps!

Happy creating!

~ Allison Cope ~

Stitched Christmas card with Kaja

Hi there,
It's Kaja from Kajcyika crafts and today I have prepared a cute stitched Christmas card! :)

Take a look:
First thing I did was the background. Even though it's a small area it took me about 3 hours to stitch it all. I went with a scene look, so I made white snowy ground and blue sky with some white snow flakes in between.

After the background was stitched I stamped out the cute cat from the Carol Kitten stamp set. I colored it in using alcohol markers in traditional Christmas colors - green and red.
Then, I used the stamps from the same set to stamp out the sentiment. I heat embossed the 'to the world' part with white embossing powder on a black card stock and stamped out the 'joy' word with red ink.

Once everything was ready I cut down a piece of gray card stock which I put behind my stitched panel. I glued everything together using foam tape and liquid glue.

That's it for today, thank you so much for joining me and hope to see you soon!
Kaja

Two Kittens in the Stocking


Hi, Margreet here from Margreets-scrapcards
I created a X-mas card with the sweet digital stamp Two Kittens in the Stocking from Gerda Steiner Designs
I started with adhering the design papers with stockings onto red cardstock.
Printed out and colored the image with copics, fussy cut it and adhered it with foamtape on the designpapers.
Added flowersoft as the fur trim.
I have enjoyed creating this card.
xxx Margreet


Wednesday, November 21, 2018

Fa-La-La-La Llamas Sleigh Ride with Karla


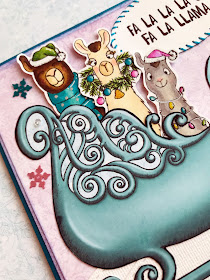
Hello! It's Karla back today to share a sleigh full of llamas using the absolutely adorable Fa-La-La-La Llamas digital stamp, which includes all three of these merry guys! I know this is going to make someone laugh when they open their Christmas card this year 😉 I started off by printing the llamas onto white cardstock and using Copics and Prismacolor Markers to colour them in as a dad, mom and little llama family. I used some gel pens to add accents, highlights and a few polkadots to the images and arranged them in the sleigh, adding foam tape under each llama's head for dimension.


I already had a Heartfelt Creations paper pad out, so I decided to stick with that colour scheme and layer on background papers and the fussy cut sleigh. They fit so wonderfully into it, and I must say they look very happy! The Fa-La-La-La sentiment comes with the set and I diecut it out with a Sizzix oval die that cuts small holes around the border. I used some blue embroidery floss to add the stitching detail and added it to the front of the card. SpiegelMom Scraps sequins, white Stickles on the hats, and some Glossy Accents on the string of lights and ornaments add just a little more bling - 'cause you can never have too much bling at Christmas!


Inside, I used a Happy Holidays sentiment from the Heartfelt Creations cut apart sheet for a merry greeting!


Thanks so much for stopping by today! Be sure to head over to the Gerda Steiner Designs Shop to check out the Fa-La-La-La Llamas and any other sweet images to start creating your own awesome Christmas cards! Have a crafty week friends 💗

Hugs,
Karla

Ghost hugs! - Larissa


Goodmorning, I am Larissa from Car-d-elicious and today I am posting a new project on the blog from Gerda Steiner designs. This time I am showing you that although halloween is over, you can still use the stampset A boo for you from Gerda Steiner designs to make a card. I have stamped one of the ghosts and then I coloured it with my Polychromos pencils and the black glaze pen. Then I have fussy cut the image. I have coloured my ghost then with the Clear Spectrum noir sparkle pen.


I have die-cut 2 rectangles from white cardstock with the Crea-nest-lies XXL 56 from Crealies. I glued those together with a strip of double sided tape and then you get a card. With the Crea-nest-lies XXL 52 from Crealies I have die-cut a rectangle from purple design paper from the Floral-graph rainbow petite prints from Doodlebug. I glued the design paper on the card. I have made and printed the sentiment on the computer and then I have die-cut it with the Crea-nest-lies XXL 44 from Crealies and then I adhered it with foamtape on the card. I adhered the ghost also with foamtape above the sentiment. I have die-cut a couple of tiny hearts with the Lots of hearts - Creative cuts from Mama elephant and added those around the sentiment. I added glossy accents on the hearts. I added 3 little white hotfix gems in the left upper corner.


I had some hearts left over that I have die-cut from the design paper and I glued those on the inside of the card.


*********************************************************************************
STAMP: A boo for you from Gerda Steiner designs
COLORING MEDIUM: Polychromos pencils
PAPER: White cs, Floral-graph rainbow petite prints from Doodlebug
INK: Versafine onyx black
DIES: Crea-nest-lies XXL 44, 52 and 56 from Crealies, Lots of hearts - Creative cuts from Mama elephant
ACCESSORIES: Clear Spectrum noir sparkle pen, Black glaze pen, gloss accents, white hotfix

Tuesday, November 20, 2018

Guest Designers | VIDEOS + Giveaway | Two Many Cards Video Series featuring On the Bookshelf


Hi, everyone! It's Emily Leiphart and Kalyn Kepner here with our new video series, Two Many Cards! We're delighted to be creating with Gerda Steiner Designs, featuring the sweet set On the Bookshelf.


Emily's video is up first:


And now Kalyn's video:


Be sure to stop by our blogs for more photos and a full supply list:


Gerda Steiner Designs is giving away one $15 store credit and the lucky winner will be chosen randomly from one of our videos, so be sure to stop by and leave a comment for your chance to win! You must be a subscriber to both our channels. Comments will close at 11:59pm EST on November 27, 2018 and the winner will be announced in our YouTube videos shortly after. Be sure to check back then. 

While comments left on our blogs are greatly appreciated, only the comments left on our YouTube videos will be included for the random drawing.

Thanks so much for watching!