Tuesday, May 30, 2017

Summertime

Hi there,

this is my third creation using the fabulous Gerda Steiner Designs Pool Piggies:


  • color one of the adorable Gerda Steiner Designs Pool Piggies with ZIG Clean Color Real Brush Pens and a damp watercolor brush
  • cut out a stitched panel from watercolor paper and create a soft background using Distress Re-Inkers (Squeezed Lemonade, Scattered Straw, Tumbled Glass, Salty Ocean)
  • use the Taylored Expressions Rolling Waves dies to cut the bottom part of the background into waves and ink up the edges with Distress Ink (Salty Ocean)
  • at the top apply Distress Ink (Mustard Seed) through the Tim Holtz Layering Stencil (Rays)
  • add some water droplets in order to create more texture
  • stamp the sentiment from the Market Street Stamps Chillaxin' set with Versafine (Smokey Gray)
  • add some Nuvo Crystal Drops (Morning Dew) and some blue sequins as final embellishments

Until next week.

Yours,


Sunday, May 28, 2017

Summer shaker card

Hello everyone

Alexandra here today from Made by Alexandra sharing a card that I made using Pool Piggies stamp set


For this card I started by creating the background. Since I haven't done the ''smooshing'' technique in a while a took a piece of acetate and Stabilo markers and the added a bit of water to make the color move. I repeated the process until I got the color I wanted .


Next I stamped the cute piggy and colored it using Spectrum Noir Alcohol markers ,and then put together the shaker card.
Also the sentiment is stamped on the inside of the card on the watercolor paper.

Thank you so much for stopping by! Have a lovely day


Saturday, May 27, 2017

Guest Designer Kimberly- Floating Down the River

Hi Everyone!
Kimberly from Kimberly's Crafty Spot as a Guest Designer.
I made another summer inspired card using the Pool Piggies 4x6 clear stamp set.


For the card, I started by water coloring a piece of water color cardstock with several blue distress inks then added some water droplets, finally I sprayed it with some shimmer mist to sparkle. This will be the water part of the river for the pig to float on.
Then, I took some kraft card stock and die cut it with some wavy border dies to look like the beach or shore, depending on where the river is, I added some dots with copic markers to look like sand. I also double stamped the sentiment in two colors of ink, with a misti stamp tool, in tan and brown.
Next, I stamped and colored the pig, then I stamped the round float and ball on some patterned paper and paper pieced the float.


I added some glossy accents to the ball, pig to look like water droplets and to the fish for bubbles.
Then I added some stickers to the card for some accents. The pig looks like he is having fun and so relaxed!!
Thanks again to Gerda and Macy for letting me be a guest designer.
I hope to have inspired you !
For more details or supplies, please visit my blog.

Thanks so much for stopping by!
Have a wonderful day!


Thursday, May 25, 2017

Guest Designer: Safari Race card: how many animals fit in a land cruiser?

Hello everyone! I'm Sandy Allnock - and I'm excited to pop over for a guest post here. I'm a coloring fanatic....and as you know, the Gerda Steiner stamp sets are MADE for coloring!

I've had my eye on the Go Wild stamp set for a bit....I wanted to create a "race" card...and see just how many wild animals I could fit into the land cruisers on just one card. I added the Party Animals just for kicks - to make it truly nutty! The little person is just a spectator...and I really hope he stays out of the way when the race comes by!

In the video I show you a quick walk-through of how I layered the images. In general, when masking - start with the image in the front and work your way backwards from there. To create room for the dust, wipe off stamps to remove some ink before stamping.

 Watch the video below or click HERE to see it in HD on YouTube.
Wasn't that just a blast!? The kittywompus cars filled with animals and happy color were just so enjoyable to color.

Hope you enjoyed this little project and might try something like it yourself sometime...and be sure to pop over and subscribe to my blog or YouTube, too, I've got more Gerda Steiner stamps in the queue coming up soon! Sandy

Supplies

Wednesday, May 24, 2017

Pool Piggies - Jeannie Lieu (InsideoutJeans)

Hi everyone! Jeannie here from InsideoutJeans... annnnd... is it summer yet?! This new Pool Piggies stamp set makes me want to head to the pool ASAP.

I was really excited about this set and as you can tell I had to use all of them at once, which needed a larger card size (5x7). I think it turned out really well and SURPRISE! the piggies in the ocean can float around... 

There's a few elements that pull this scene together. 

For the beach, I cut out the sand part from white paper and used distress inks to make it a sandy color. I added light brown dots around the edges to give it a more dimensional look. 


For the ocean, I cut out waves from vellum and colored the edges using distress inks. I wrapped the three wave pieces around the card and glued it down from the back. By doing so, the vellum isn't completely flat and vellum raises slightly from the card looking like real waves. 

Now for the interactive part! I didn't want to use foam tape in this instance. The difficulty with using vellum is that it is see through, any glue or tape will show through. I wanted it to look seamless. It ended up being really easy! I punched a hole, using a single hole puncher, in the wave. I used a small circle as a backer. I sandwiched the pig and the small circle with a glue dot in the middle of the hole in the wave. This way, the piggies can float in the water without all the bulk. 

Hope you all enjoyed the card. This set is super cute and gives me all the summer feels! 

~ Jeannie

Tuesday, May 23, 2017

Party!

Hi there,

this is Tanja with another creation using the fun new Gerda Steiner Designs Pool Piggies stamp set:

  • color one of the adorable Gerda Steiner Designs Pool Piggies with Faber-Castell Albrecht Dürer Pencils and a damp watercolor brush
  • cut out a tag from watercolor paper and create a background with Distress Ink (Tumbled Glass) and Distress Oxide Ink (Broken China)
  • cut out a smaller piece with the same tag die and create a beach with the help of one of the My Favorite Things Stitched Snowdrifts dies - ink up the edges with Distress Ink (Gathered Twigs)
  • stamp the palm trees from the Paper Smooches Get outta Town set and the cocktail from the My Favorite Things Penguins in Paradise and color the images with watercolor pencils as well
  • stamp two sea gulls from the same Paper Smooches set with Versafine (Smokey Gray)
  • cut out a second tag from patterned paper from the Echo Park Summer Bliss 6x6 paper pad and layer it slightly offset behind the main tag
  • cut out a stitched panel from Neenah Desert Storm kraft cardstock and stamp a background with the help of the Judi Kins Papyrus stamp and Adirondack Dye Ink (Latte)
  • stamp the sentiment from the Market Street Stamps set Tikki Time with Versafine (Vintage Sepia)
  • thread blue and natural twine through the hole of the tag

Have a wonderful day.

Yours,


Monday, May 22, 2017

Pool Piggies Guest Design Paper Creations by Mindy

Hello!! This is Mindy from Paper Creations by Mindy and I'm super excited to be Guest Designing for Gerda Steiner Designs for this super cute Pool Piggies stamp set! There are so many super fun summer cards I have in mind!

My first card is with a fun distressed background. I used my Tim Holtz distress inks but this background was one of a few that I was experimenting with and unfortunately forgot to write down my colors. Lesson learned! If I were to venture a guess - I would say Cracked Pistachio, Broken China and Faded Jeans. I diecut the distressed background with my Striped Sentiment Strip Die to create the white lines. I thought it broke up the background nicely.

I colored up my cute piggie and raft and cut them out with my Scan N Cut machine then pop dotted it onto my card front.


Copics
Raft - YR14, YR16, YR18
Shorts - B02, B04, YG09, YG06, YG03
Hooves - N6, N5, N4
Pig - BV00, R000, R00, R01, R02


Sunday, May 21, 2017

Guest Designer Kimberly- Let's Hang at the Pool

Hi Everyone, Kimberly from Kimberly's Crafty Spot.
Today I am sharing a fun card as a Guest Designer for Gerda Steiner Designs.

(This blog post contains affiliate links.
Compensated affiliate links used when possible at no extra cost to you.
I just receive a small portion of the sales through your purchase. So Thank You!!)

For my card, I made a gel card for the cute piggy from the Pool Piggies 4x6 clear stamp set to float in on her little pool floatie.


I started the card with a white rectangle, then I die cut a rounded rectangle from it and also embossed the edge of the rectangle. Then I stamped the cute pig and colored her with copic markers, I paper pieced her bikini, pool float, towel and ball from the Sunkissed 6x6 Doodlebug paper. Next, I added some glossy accents to her sunglasses and the ball. Then I stamped the sentiment from the set on the towel and heat embossed it in clear.
Next, I made the 'pool water' portion of the pool. I used a small snack size ziplock bag, I cut it down to size and sealed it with my fuse tool. Then I added some heart and star sequins to the bag then some blue hair gel, then more sequins and again until my bag was full enough.
Then I adhered the bag to the backside of the die cut rectangle panel, then added that to a white card base with foam adhesive. Next, I added the cute pig and ball to the water panel, then the towel with the sentiment to the bottom right corner. Finally, I added some glossy accents around the card to look like water droplets.


The card is so fun, if someone presses on the gel it moves just like water and the cute pig goes up and down. I hope you were inspired by my card, I know I am ready for summer and some fun pool time!
Thanks to Gerda and Macy for giving me the opportunity to be a guest designer again, I am honored.
If you would like a list of the supplies used or anymore details, please visit my blog.
I hope you have a wonderful day!


Saturday, May 20, 2017

Guest Design - Kitten in Flowerpot by Australe Créations

Hello everyone! 


It's Céline from Australe Créations for a card made with the digital stamp Kitten in Flowerpot of the spring digital stamp bundle.


Colored with Copic markers and a splash watercolor background


I hope you like it ?
                                                                 
See you soon


Friday, May 19, 2017

Enjoy the summer

Hello everyone!

Alexandra here from made by Alexandra showcasing the new Pool piggies stamp set


Those piggies just make me giggle ! They are cuteness overload! 
For this card i started by inking the background using Salty Ocean distress ink and that is my sky! Next i die cut the ocean waves and the sand borders and the inked them using Mermaid lagoon distress ink and Vintage photo distress ink for sand borders.


For the piggie and the ball i used Spectrum Noir Alcohol Markers, and the palm tree i draw myself cause i didn't had any palm tree stamp and the colored also with Spectrum Noir markers.

To finish the card i stamped the sentiment and adhered everything using a combination between foam tape and liquid glue.

Thank you so much for stopping by! Have a lovely day! 
 

Thursday, May 18, 2017

Stay PAWsitive!


Hey All....

Christine here today - to share a card I made with the fabulous All Cats Stamp Set.  The set has three cats and a little bird in all - with fabulous sentiments too!  


I stamped and coloured the kitty  (my take on a marmalade cat!)..   then coloured the bird too.  I fussy cut both, and then shaped and used a 3D foam pad to adhere  them onto my card.  I used a scrap of designer paper to sit the cat on.  I used one of the fab sentiments alongside - this is what the birdie is telling the kitty..  hope she takes notice!

A big thank you to Gerda Steiner Designs for allowing me to Guest on the Design Team - I've love being a part of it!

Happy Crafting...

Christine x

Wednesday, May 17, 2017

(Not So) Moody Unicorns - Jeannie Lieu (InsideoutJeans)

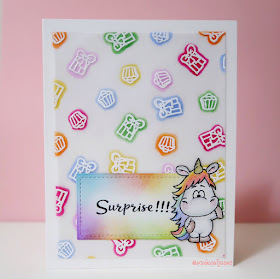
Hello again! It's Jeannie from InsideoutJeans. I'm glad to be back on the GSD blog to share another card with you. I really love doing interactive cards but sometimes, simple is so pretty! This time, it's a really easy, fun, and colorful card using the adorable waving unicorn from Moody Unicorns.


Usually, a stamp set has a lot of smaller stamps that can be used to create a gorgeous background. I really had fun creating this one. The best part is that it's really easy to recreate. 

First, I used some vellum paper and stamped the cupcake and present randomly using Versamark ink. Afterwards, I used white embossing powder and heat set it. Now the fun part! You don't need many different ink colors or anything. I just used my Spectrum Noir markers I had on hand. I flipped over the vellum and colored the back of the stamp, outlining it a bit and coloring it solidly behind. When you flip it over again, you can see that the white heat embossed image looks amazing against the different colors. The array of colors work with the unicorn perfectly. 


I originally had just die cut out a rectangle box for the sentiment, leaving it white so the unicorn could stand out, but it just looked funny. I needed some color added to the sentiment, so I used distress inks matching the markers I used to create a soft, colorful border around the sentiment. What do you know? It matched the unicorn perfectly. 

Hope you enjoyed my card and will create something similar. I'd love to see them! 

Jeannie ~
IG: InsideoutJeans
FB: InsideoutJeans

Tuesday, May 16, 2017

Enjoy the Summer

Hi there,

it's Tanja here and my next four posts will be all about the brand new Gerda Steiner Designs Pool Piggies:


  • color one of the adorable Gerda Steiner Designs Pool Piggies with ZIG Clean Color Real Brush Pens and a damp watercolor brush
  • cut out the Paper Smooches Palm Tree from watercolor paper and color it with Distress Inks (Mowed Lawn, Gathered Twigs)
  • cut out a tag from watercolor paper and create a background with Distress Ink (Tumbled Glass) and Distress Oxide Ink (Broken China)
  • cut out a smaller piece with the same tag die and create a beach with the help of one of the My Favorite Things Stitched Snowdrifts dies - ink up the edges with Distress Ink (Gathered Twigs)
  • use the sentiment from the same set
  • thread teal and natural twine through the hole of the tag

Thanks for stopping by today.

Yours,


Monday, May 15, 2017

Hoppiness Card - Jeannie Lieu (InsideoutJeans)


Hello Everyone! 

My name is Jeannie from InsideoutJeans. I have quickly fallen in love with Gerda Steiner stamps every since spotting the Moody Unicorns on Instagram. 

I’m here today to feature a set that I’m currently loving right now, Hoppiness. I really love making interactive cards and here’s one that was in my mind before I even got hands on this set. 


I wanted an unexpected, hidden surprise for someone receiving this card and the fence stamp that comes in this set works perfectly for this! 


The peeking bunnies allow me to have a hidden bunny peeking behind the opening fence. All you need to do is open the fence and you'll see his curious face staring at the bird!


Hope you all enjoy this fun, spring card!  

Jeannie ~
IG: InsideoutJeans
FB: InsideoutJeans

Happy Birthday!

Hello everyone!

Alexandra here from made by Alexandra sharing a pop up box card that I made using Party animals stamp set and the sentiment and banner from Alien invasion


I always loved interactive cards, and this pop up box card is just perfect too add all the critters from the stamp set when you don't know which one too choose :) , but also can be intimidating to create one! I remember that I saw lots of pop up boxes on Instagram but I felt like they are so hard to make .

But no ! They are very easy and also they create addiction :))

To start I cut a stripe of paper 12 cm tall ( scoring at 6 cm ) and 25 cm long.
Then I scored every 6 cm ,12cm ,18 cm and finally 24 cm leaving 1 cm to be able to close the pop up box. 
The upper part where the scoring is I cut were the scoring lines are so when the box is open you are able to see the critters inside.
Also I cut 3 stripes of paper 1 cm tall and 8 cm long to have were to put the critters inside the box.


Next I colored the critters from Party animals stamp set using Spectrum Noir Alcohol Markers and also inked the entire box using Distress inks and to add  a bit of details I used a stencil.

The sentiment is from Alien invasion and the banner too . I adhered everything using strong tape and my card was done!

Thank you so much for stopping by!  Have a lovely day!


Sunday, May 14, 2017

Guest Design - Ice cream by Australe Créations

Hello everyone! 

It's Céline from Australe Créations, I’m so happy to find you, I hope you are well !

Today I propose to give in to temptation with beautiful digital stamp I Scream for Ice Cream


I made a background of ice cone, colored with Copic Markers, wink of stella et glossy accents,..


Kraft cardstock and label with sentiment,


 You succumb to temptation?
                                                                 
See you soon


Saturday, May 13, 2017

WOW | Go Wild clear stamp set

Hello again - it's Anna Sigga here with another Go Wild card.


I just adore this stamp set to bits - and these lil critters are so darn cute. Cause these are so adorable and cute I wanted to create a dream-like card using clouds and soft colors.


The Go Wild dies make these kinds of cards a breeze to put together.


And since we are all dream-like I just had to add some sparkly  clouds too - cause sparkly clouds are awesome right?!?


I used part of one of the sentiments that come in this set to stamp on the inside of the card. And I just had to put one more elephant on the inside cause these images are just too fun.


Thank you so much for stopping by and I have had so much fun guest designing for Gerda Steiner Designs this month.

Friday, May 12, 2017

Interactive Dino card

Hello once again!

Kamila here from Life in Moments and today I have for you a fun and colourful interactive card using the super cute Coffeesaurus stamp set. I love creating this card, I wanted it to be colourful and fun! The dino image is adorable and I love how he wobbles all over my card front :)
I did some ink blending on the background with fun summery colours and I sprinkled some simmery droplets so add some texture.

I hope you will enjoy the video!


supplies:

GDS - Coffeesaurus stamp set
Memento Tuxedo Black ink
Pro Markers
Distress inks - Salty Ocean, Cracked Pistachio with Mowed Lawn, Twisted Citron, Mustard Seed
Neenah Solar White card stock
Versa Mark Black Onyx ink
Grape Jelly - memento ink
action wobbler
Tim Holtz scissors