Thursday, March 31, 2016

Purple Birthday Card featuring Happy Hoppy

Purple Bunny Birthday Card by Jess Gerstner for Gerda Steiner Designs

Hello crafty friends! It's Jess from JessCrafts.com and today I'm sharing a clean and simple birthday card with the new Happy Hoppy clear stamp set. I wanted to try creating a card element with the sentiment so I stamped a block with the sentiment. For more on how I achieved this look check out my video.


Remember to share your creations with us over in our Facebook group and join in on the Progressive Challenge each month if you love Gerda Steiner's digi stamps!

Purple Bunny Birthday Card by Jess Gerstner for Gerda Steiner Designs

Tuesday, March 29, 2016

Happy Birthday Bubbles

Hi there,

it's Tanja here again and I would like to show you this Spring Birthday Card:

Thanks for visiting our blog.

Hope to see you again soon.

Yours,


Saturday, March 26, 2016

A play on words and a bit of masking

Hello everyone!
This is Maike from Maikreations and for my fourth card (I can't believe that the month went by so quickly) I used the set "Lucky Duck" once more and did quite a bit of masking.


I knew I wanted the sentiment to be below the ducks so I made sure to leave enough space. Once I had stamped all the images, I coloured them in using Copic markers. Next I added the grass at the shore and the water. When I die cut the letters for the sentiment I deliberately die cut the first ones in capital letters to emphasize the play on words here. The sentiment means "Finally you are here", but usually you would spell the first word a bit differently. I purposely misspelled it and wrote "ENTlich", because in German the word "Ente" means duck. After I had heat embossed the second part of the sentiment I adhered the die cut letters and glued the panel to a white card base.


It has been fantastic being guest designer here at the Gerda Steiner Designs blog for the month of March. Have a very happy Easter everyone and happy crafting ;o)

Thursday, March 24, 2016

Video: Tri-Fold Birthday Card + Stenciling

Hi guys, it's Emily Cupely here!! I hope you are having a great Spring break! I finally had some time to make a tri-fold card with some masking and stenciling. I think the final card turned out beautifully, specially the inside part where I decorated all three panels instead of just the central one. All the stenciling along with the adorable puppies from the Howl Are You stamp set and the pop of color in the balloons will hopefully have a nice impact in the recipient :) I hope you all enjoy the video as much as I enjoyed making it!


http://gsd-stamps.com/collections/shop-clearstamps/products/howl-are-you-puppy-clearstamp-set

http://gsd-stamps.com/collections/shop-clearstamps/products/happy-hoppy-4x6-bunny-clearstamp-set http://gsd-stamps.com/collections/shop-clearstamps/products/just-sentiments-4x6-clearstamp-set

Wednesday, March 23, 2016

Baby on the moon!!

Hi there!!

It's Yolanda here, from Scraping Time! I hope you are enjoying a lot these days! It seems it´s a long time since I came here because I have been so busy with the end of the term!! But now, luckily, I am on holidays till next Monday!

Today, I want to show you a card with a very sweet digital stamp. This baby from Gerda is just lovely, isn´t it?

And this is my finished card:


I love paper piecing so the first thing I did was printing the stamp on a yellow decorated paper. It was a bright light yellow with white dots paper, so I used "Scattered Straw" distress ink to make it a bit darker similar to my decorated paper stars. Then I fussy cut it and put some Wink of Stella Clear on it. Then, I printed the stamp again on white cardstock and fussy cut everything but the moon. I coloured it with Spectrum Noir Markers and put some Wink of Stella again on some details of the stamp...  I should say: My name is Yolanda and I am Wink of Stella Addict!! I just LOVE it!!


I wanted my stamp to be the main element of the card so I die cut a small baby sentiment from Clearly Besotted to finish it! I prepared my card base. I made it on white cardstock and I inked with the same colour of distress ink the borders. A very simple card but I think those little details make it nice for a mum to be! 


I invite you to see another card I made some months ago with the cute "Two storks with a baby" here.  I hope you´ve enjoyed and see you soon!! 


Monday, March 21, 2016

Happy Hoppy Easter

Hey everyone! It's Wiebke here and I wanted to share a card with you using the Brush Bunny and Happy Hoppy stamp set!


I stamped the bunnies on a piece of watercolor cardstock. I cut them into four pieces and colored them with the ZIG Clean Color Real Brushes. Each background got his own pastel color. At least, I embossed the sentiments on a piece of black cardstock. That way, they're the main focus in front of the bunny background.


Are your ready for easter?! :)
Have a great day!


Saturday, March 19, 2016

You are simply the best

Hello everyone ;o)

This is Maike from Maikreations and I am happy to be back with my third card. This time I have used all three bunnies from the "Happy Hoppy" clear stamp set to create a fun and colourful card.


For my card I chose to go with white bunnies, so that they would stand out against the yellow, pink and turquoise backdrops. When I had coloured and fussy cut the three cuties I die cut the egg-shapes from a white panel. With the help of that panel and a pencil I marked where I wanted to sponge on the ink, masked off the area, erased the pencil line (this is the important step, which I always need to remind myself of) and used an ink blending tool to lightly sponge on the colours. 


Next I die cut the frames for the egg shaped holes and coloured them with the same colours (Squeezed Lemonade, Spun Sugar & Peacock Feathers), only this time I put lots of ink on there, so that the frame would be a little darker than the background colour. I glued the frames in place with some liquid glue, stamped the sentiment and adhered the panel to my card base using foam tape. Now came the fun part. I chose a space for each bunny, added them using foam tape as well and also added an Easter egg balloon to the bunny on the right.
 

I hope you like the card and got inspired. Happy crafting, everyone ;o)

Friday, March 18, 2016

Hoppy Spring Art Journal Page


Aloha Guys!  This is Joyce from http://enjoyscrappin2.com and today I have this whimsical Art journal page for you.  When I saw this adorable bunny holding a paintbrush, I knew I wanted to create a journal page.  This video is slightly longer than my usual because there was a lot of steps but I hope you enjoy the process.  I'll see you back soon.  Thanks :)

Thursday, March 17, 2016

Tie Dye Awesomeness


Hello crafty friends! It's Jess from JessCrafts.com and today I'm sharing a bright fun card with the new Happy Hoppy clear stamp set. I love the fun positive messages in this set. I created this fun tie dye look using Distress Crayons and blending with a little bit of water and my finger. Distress Crayons are no longer water reactive once dry and the paper is quite smooth so you can stamp right on top it. 


Remember to share your creations with us over in our Facebook group and join in on the Progressive Challenge each month if you love Gerda Steiner's digi stamps!

Tuesday, March 15, 2016

Ruff Day?

Hi there,

it's Tanja here and I have a fun no-line coloring project for all the critter- and especially dog-lovers among you:


I hope that you like my creation and use your little crafty experiments on future projects.

Yours,

Friday, March 11, 2016

Hello Duck

Hello everyone!
This is Maike from Maikreations with a new card - this time using the adorable "Lucky Duck" set.


First I stamped the cute diving duck and masked it off. In order to create the background I started with the bottom part first using three different shades of blue Distress Inks: Salty Ocean, Blueprint Sketch and Chipped Sapphire and added a few drops of water next. I let the droplets sit for about a minute before I took them off with a tissue. Next I masked the water area as well and added a layer of Mustard Seed before placing a circle mask on top. Because I wanted to create the look of a sunset I used red and orangy colours: Spiced Marmelade, Abandoned Coral, Candied Apple and a tiny, tiny bit of Seedless Preserves at the very top.


When everything was dry I coloured the duck in using Copic markers and also die cut the word hello from the bottom part of the panel. I adhered some vellum behind the panel to be able to stick the inner parts of the letters back where they belonged. Then I placed an orange piece of cardstock behind the area with the die cutting to make it look like the red from the sun set would shine through the vellum. Now all that was left to do was to glue the little fish all around the die cut sentiment and to adhere the finished panel to the vanilla card base.


Happy crafting everyone ;o)))

Thursday, March 10, 2016

Video: Shaker With Dry Embossed Acetate

Hi guys!! This is Emily Cupely and for today's video I made a shaker card using the cute images from the Happy Hoppy stamp set. This time, I did some dry embossing on the shaker window which gave the card a nice and different touch. I hope you enjoy the video below and get some inspiration! :)


http://gsd-stamps.com/collections/shop-clearstamps/products/happy-hoppy-4x6-bunny-clearstamp-set http://gsd-stamps.com/products/gsd462-brush-bunny-clear-stamps-set


Wednesday, March 9, 2016

Happy bunny-birthday!

Hi there!

It's Yolanda here, from 
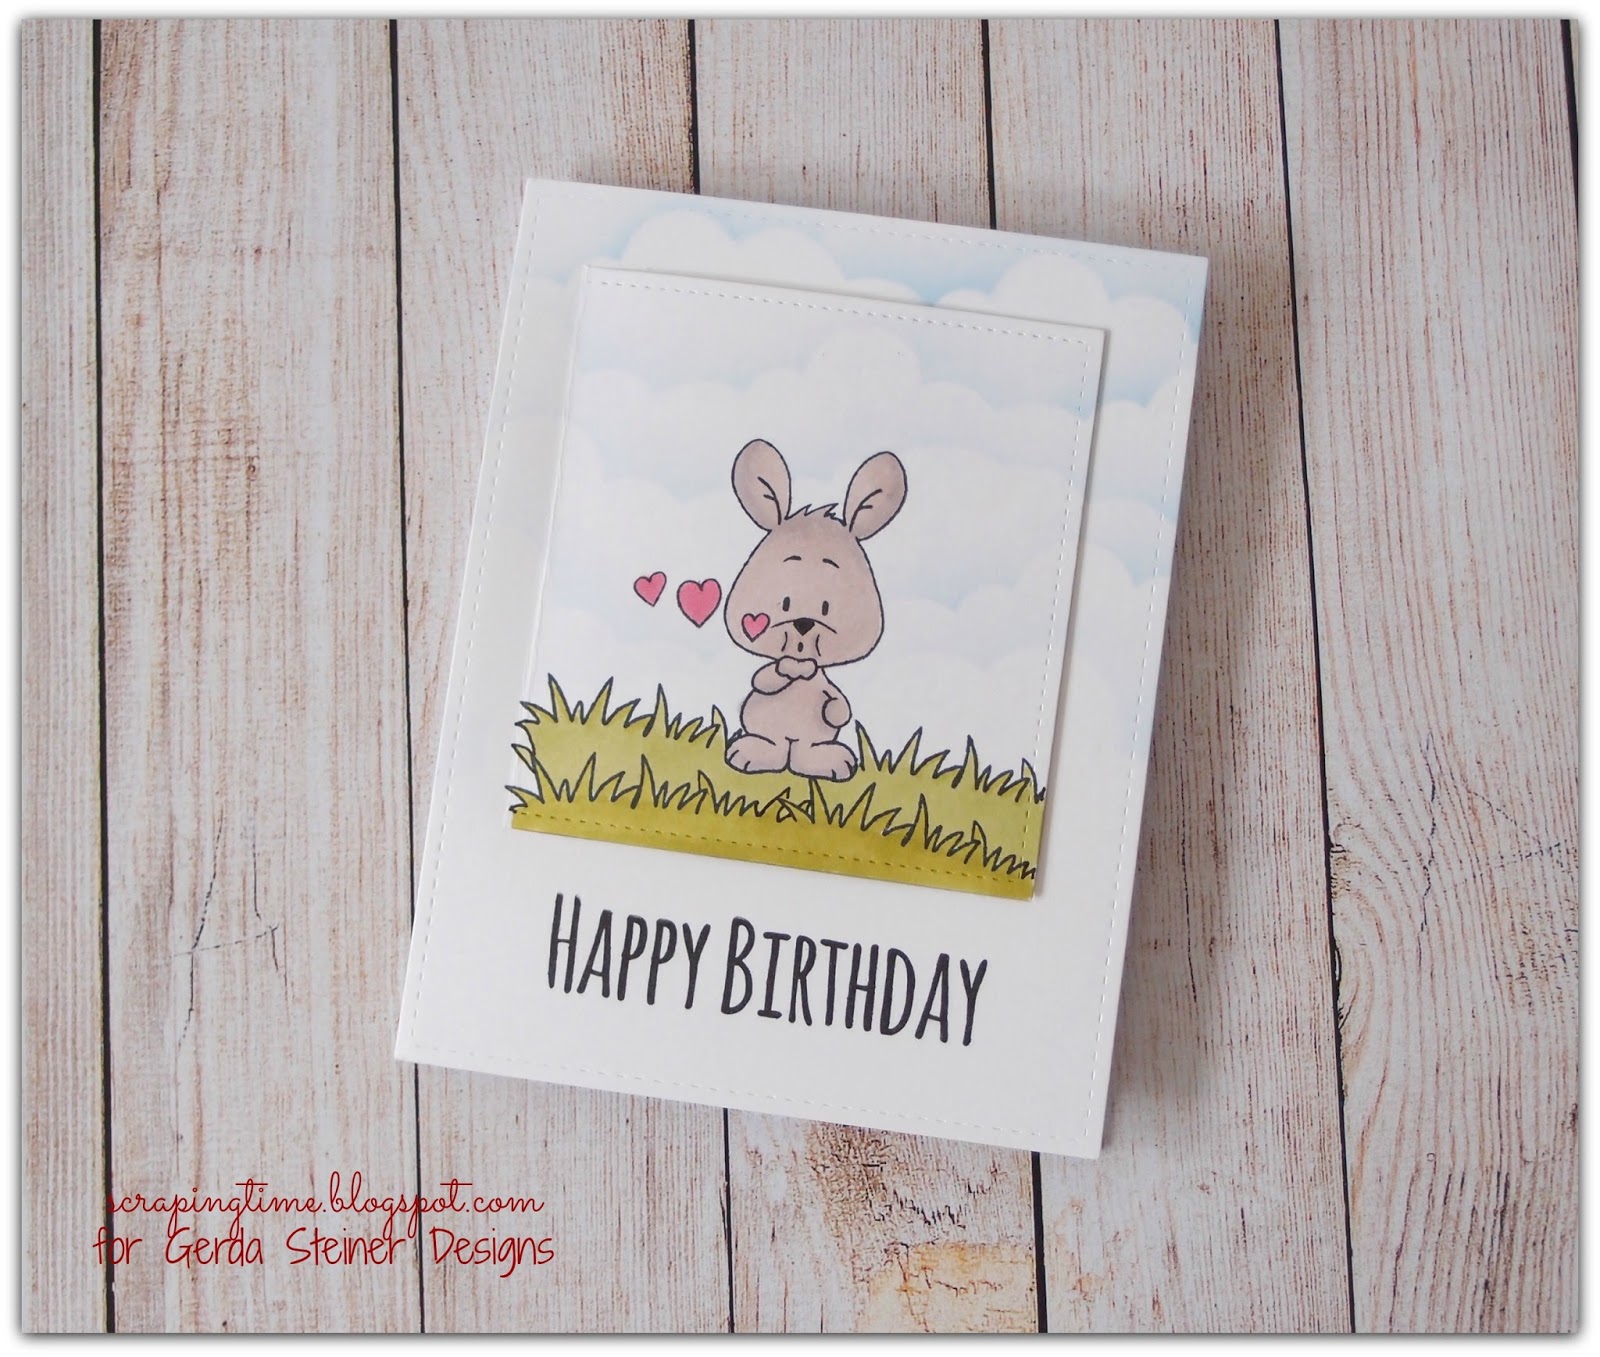
Scraping Time. Today, I have made a card with some stamps from different sets: "Just sentiments", "Howl are you, puppy?", "Happy hoppy 4x6 bunny" and  "Brush bunny" stamp sets.

All these stamps can be combined easily and I really had fun playing whit these cutties!


I really love these sets and I wasn't able to choose just one so I decided to play a little bit with my dies and make a window on the main panel of the card. I  used a false stitched square die and I did partial die cutting with my Big Shot. Then I stamped and created the first part of the scene. 
The sentiment is so cute and I love how it looks stamped with Versafine ink.
I made some clouds with Memento Blue Sky ink before making the window and I coloured my image with Spectrum Noir Markers. I love the hearts stamp!!!!!! What a cute complement for this set!!!! 


But then, when you open the window, you find the second part of the card and sentiment.


The "to youuuuuuuuuuuuu!!!" sentiment was a bit long for the space I had so I masked a part and stamped just some of the "u".

I tried to continue the scene inside, so I made the same clouds. And I added a carrot to the balloon... just for fun!! :))


I  think, you can use this card to put a gift card hidden into the window or making there a shaker. Your creativity is the limit! ;) 

I hope you have enjoyed with my card and have a good week! See you soon! 

Monday, March 7, 2016

What's up, Mrs. Hamster?

Hey crafty friends! It's Wiebke here for you today! And I want to share with you a card featuring the absolutely adorable Gopher it! stamp set!


I'm totally into pastel colors lately! Matching to the chubby cheeks of this cutie, I decided to use rose colors for my whole card. I die cut an arch and put a Distress Ink blended rosé background behind. Then I placed the hamster on it and added a pink string. Pretty casual, but that way the soft colors really come to life :)


Have an amazing day!


Saturday, March 5, 2016

Hoppy Birthday

Hello everyone!
This is Maike from Maikreations and I am super excited to be guest designing here at the Gerda Steiner Designs blog for the month of March ;o) I had a lot of fun playing with the stamps and couldn't have been happier with the two sets I was given! 

For my first card I used the very cute "Happy Hoppy 4x6 Bunny Set". I made a birthday card this time, but you could easily adapt the design to an Easter card for example.


With the carrot in the set I stamped three garlands and coloured them using Copic markers. Next I stamped and coloured the cute bunny from the set blowing a kiss. I thought the image was just perfect for a birthday card. After I had fussy cut him out I drew the hill for him to stand on and glued the cutie to the card. To give it more dimension I adhered the head with foam tape whereas I used regular snail tape for his bottom half. 


For my next step I had to cut the "Happy Birthday" sentiment which is included in the set apart and replace the word "Happy" with "Hoppy". 
I hope you liked this first card and am looking forward to sharing some more projects with you these next couple of weeks. Happy crafting, everyone ;o)

Friday, March 4, 2016

Gopher a Coffee?


Aloha Guys!  This is Joyce from http://enjoyscrappin2 and today I have this super fun card for you.  I am using the Gopher it stamps set and I decided to go with the Coffee theme, with the Gopher popping out of a coffee cup.  Super fun, right?  I hope you enjoy this card and the video and I'll see you back soon :)  Thank you.